Handmade jewelry, will always look very original and stylish. Such decoration can attract the attention of others. Many people hesitate to make jewelry for themselves with their own hands only because they lack imagination, fresh ideas and certain skills. But if you follow the step-by-step master classes presented below, you can make an unusual decoration yourself at home. Let's take a closer look at what kind of decorations can you make? on the neck with your own hands.
In contact with
Neck Jewelry
Pendants
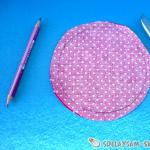
Stylish lanyard around the neck
- Suede or leather lace;
- Accessories;
- Pliers.
Step-by-step instruction:
- You should start by cutting the lace to the required length.
- Attach fittings to the edges of the lace.
The jewelry for the neck is ready. Thus, you can very simply and in the shortest possible time make an unusual cord around your neck with your own hands.
Bottle pendant

Step-by-step instruction:
- You need to start by securing the pin to the cork so that the bottle can be conveniently hung on a cord or chain. To do this, the pin must be well coated with glue and threaded into the cork, as shown in the figure.
- After this, the free end of the pin must be smoked into a ring using pliers. In this case, it is worth paying attention to the diameter of the ring, since the chain must pass through it freely. If the size of the pin does not allow this, then you can make an additional ring from wire of the required size. Attach the resulting ring to the pin.
- Then you can start choosing the material with which the bottle will be filled. Absolutely everything can be used here. A small key, dried flowers, rhinestones, beads, seed beads, sparkles and much more will look very original.
Glitter pendant
For manufacturing you will need the following materials:
- Glitter;
- Metal base for pendant;
- Matte glue;
- Brush;
- Pliers;
- Chain with fittings or cord.
Step-by-step instruction:

Broken glass pendant
This version of the pendant is made using the method described above, only instead of sparkles, broken glass is poured into the workpiece. To do this, you must select glass fragments of two or more flowers in advance. The glass must be crushed well using a hammer. After this it is necessary glue to base, as in the previous version. When the glue has dried, the glass can be repainted any color you wish using regular nail polish.
Chokers
Braided choker
For manufacturing you will need the following materials:
- Elastic beading thread or wire from old headphones;
- Scissors;
- Scotch.
Step-by-step instruction:
- Fold the string in half and tape it to the table as shown in the image.
- Start weaving the choker according to the indicated pattern.
Ribbon choker
- Fabric ribbon of the desired width;
- Accessories for processing the ends of fabric tape;
- Scissors;
- Pliers.
Step-by-step instruction:
- Cut a piece of fabric ribbon to the desired length.
- At the ends of the linen, secure the fittings using pliers.
The ribbon around the neck can be tied in a bow at the back.
Choker with ring
For manufacturing you will need the following materials:
- from fabric;
- Metal ring;
- Super glue;
- Scissors.
Step-by-step instruction:
- Cut the fabric ribbon into two equal parts.
- Glue the edges of the halves to the ring with superglue, as shown in the image.
This choker can be tied around the neck with a simple knot. If you make the same decoration a smaller size can be worn on the arm as a .
Choker in Chanel style
For manufacturing you will need the following materials:

Step-by-step instruction:
- Cut the wire along the circumference of the neck, bite off the edges so that it is comfortable to put on the neck.
- Place large beads on the edges of the wire.
- Drop a little superglue into the holes of the beads and insert the fittings into these holes for fastening.
Similar to this technology You can make the same bracelet with your own hands, but only in a reduced size.
Chains and necklaces
Chain with braided pendant
For manufacturing you will need the following materials:
- 6 thick threads or laces of various structures and shades;
- Chain;
- Centimeter or tape measure;
- Scissors;
- Pliers;
- Masking tape;
- Chain clasp.
Step-by-step instruction:
- First, you should decide on the length of the future product and cut the required size of the chain.
- Fold the resulting piece of chain in half, place 6 laces parallel on top, as shown in the image.
- Secure the chain around the laces as shown in the image, and then secure it with tape to the table and begin weaving.
- When the wicker pendant is completely ready, the ends need to be trimmed, leaving a few centimeters.
- Attach the clasp to the ends of the chain using pliers.
Bean necklace
For manufacturing you will need the following materials:

Step-by-step instruction:
- First of all, you need to paint the beans in the desired color with nail polish. Leave the grains until completely dry.
- Attach the printed template on the reverse side to a piece of transparent plastic.
- Glue the beans onto the plastic using superglue, as shown in the diagram.
- It's best to assemble the larger bean patterns first and work on the gaps later. They need to be filled with small beads, as shown in the image.
- When the entire workpiece is sealed with beans and beads, it must be given time to dry completely.
- Using a utility knife, trim the plastic along the edges of the product.
- Using a hole punch, make holes at the extreme points on the plastic into which you need to thread the chain links.
- Attach clasps to the ends of the chain.
Bead necklace
For manufacturing you will need the following materials:
- Medium size beads or large beads;
- A hairband that is covered with fabric;
- Needle and thread;
- A small piece of fabric to match the beads or beads;
- Scissors;
- Super glue.
Step-by-step instruction:

DIY bracelets
Now let's look at what kind of bracelets can be made make it yourself from scrap materials.
Ribbon bracelet. Option 1
For manufacturing you will need the following materials:
- Wide plastic bracelet;
- Ribbon or braid with a pattern;
- Gluing gun;
- Beads or seed beads for decoration.
Step-by-step instruction:
- Apply a small amount of hot glue to the inside of the plastic bracelet using a gun, and attach a ribbon to the glue. Begin to evenly wind the ribbon or braid around the bracelet along its entire circumference.
- The tape must be periodically fixed on the inside with drops of glue. If your tape has a pattern, and when winding it does not match, then there is nothing to worry about.
- When the tape is completely wound, it must be cut and the ends secured with glue.
- Using glue, attach several beads to the bracelet.
A stylish and original bracelet is ready! It takes a maximum of 20 minutes to make.
Ribbon bracelet. Option 2
For manufacturing you will need the following materials:
- Ribbon;
- Wire;
- Needles;
- Super glue;
- Decorations according to your taste (flowers, buttons, clips, buttons).
Step-by-step instruction:

Our wonderful jewelry is ready!
Costume jewelry is a very important element of jewelry for women. After all, with its help you can create unusual, interesting and beautiful combinations that are sure to attract attention and perfectly complement the image. Moreover, it is not at all necessary to use factory options. Decorations can be easily created with your own hands.
What might you need?
The quality and quantity of materials from which you can make beautiful jewelry with your own hands depends on what needlework technique you master. Costume jewelry can be knitted, paper, made from beads, seed beads, etc. Accordingly, you will need:
- colored thick paper
- wool for knitting
- beads and beads
- wooden blanks
- a stand on which it will be convenient to collect unusual and beautiful jewelry
Knitted options
Knitted jewelry is one of the most common types of handmade jewelry. Today there are a huge number of auxiliary accessories with which you can easily and quickly assemble interesting things.

For beginners, simple options for earrings and beads are suitable. It is enough to take wooden beads and carefully tie them with ordinary single crochets. To make your jewelry as interesting as possible, you can alternate threads. Knitted themed versions of costume jewelry can be called unusual. More experienced craftswomen can always make whole sets of fruits and vegetables to make the earrings original. Unusual handmade jewelry is not only suitable for ladies at work.

Very often, knitted products are actively used by young mothers. The so-called baby sling beads are knitted balls that are completely safe for the health of the baby and his mother, because... are made only from high quality threads.

Knitted decorations, like costume jewelry, have one distinctive feature - they will always be in a single copy. This means that this kind of jewelry is especially expensive and valuable. Knitted jewelry is often created on a fork, or a stand is used to keep the beads securely in place. This way you can create very interesting products with your own hands.
Vintage jewelry - how to make
You can also make unusual vintage jewelry with your own hands. They can be leather, knitted, felted and so on. The main thing is to carefully study the era that you take as a basis so that the jewelry turns out original and stylish.

Vintage jewelry provides the master with the opportunity to realize all his fantasies. Unusual, fragile, thin and delicate - such handmade jewelry can be truly exclusive.
Unusual knitted with the thinnest cotton threads, decorated with crystals and beads, vintage bracelets, beads and earrings will ideally complement the look and allow you to realize any unusual fantasies. To make these, you may need all the accessories and fabrics found in your grandmother's chest. For beginners, lace from previous eras, rolls of paper, fishing line, thin threads and much more are perfect.

Vintage jewelry requires a lot of patience and perseverance to be able to make it with high quality and painstaking care. Try to master weaving - for beginners it is not as difficult as it seems. With its help, creating knitted vintage jewelry with your own hands will be as easy as possible.
Paper jewelry - a special style
You can make unusual decorations with your own hands from paper. They can even look like knitted or vintage ones, provided you select the right pattern and weave. Most often, paper decorations are used to decorate rooms. It’s so easy to create unusual three-dimensional flowers with your own hands from paper and depict entire compositions. But paper jewelry is not the best option, as it will look quite strange.

Vintage versions of paper decorations can be thin, weightless and unusual snowflakes, ornate patterns on glass and stained glass, and so on. For beginners, simpler options are suitable, when you need to create some kind of three-dimensional composition from paper, for example, a bouquet that can be placed in a vase and decorate the room.
Learning how to make various masterpieces out of paper is not as difficult as it seems. You will need:
- stand
- fishing line
- scissors
- special paper (corrugated paper will also work)
- stapler

For example, to make a simple flower, all you need to do is take corrugated paper (can be multi-colored), which must be cut into small round shapes, each of which has a diameter smaller than the previous one. Next, they need to be placed one on top of the other, laid out on an accessory such as a stand, and attached to the trunk, which is also made of paper.
To make the composition more interesting, you can do this: add knitted or vintage elements to make the paper product sparkle in a new way. The main thing is to bring all your creative potential to life with your own hands.
Indian jewelry
Indian jewelry can also be made with your own hands, and it will not take much time and effort even for beginners. Indian style jewelry is very authentic and original. Very often it consists of knitted elements combined with wooden ones. Making such beads, bracelets or earrings is easy.

Despite the fact that many experts claim that Indian decorative elements are classified as “not for everyone,” if you look at them more closely, you can find real masterpieces. If desired, you can do them yourself. To create this type of jewelry such as Indian beads and bracelets, you will need:
- fishing line
- stones
- beads

Sometimes there are also options made of paper, knitted and even vintage in their own way. Indian jewelry also allows the use of various metals. So, for example, to make a bracelet, take a copper blank and glue beads or stones onto it. You can shade them with folded leather or add a little corrugated paper. The stand will help you not to miss, because you will securely mount your product on it. Indian jewelry, created with your own hands, fully reflects the spirit of the master and has his soul. Therefore, such jewelry is especially warm and “alive.”
Creating jewelry - Indian, knitted, vintage, paper - it doesn’t matter - it’s an entire art. After all, such jewelry and decorative elements will stand out against the general background and represent a single piece or set. Allow yourself to put your whole soul into it and then even your jewelry will be beautiful, interesting and unusual.
A girl with exclusive jewelry always attracts attention. And you don’t have to buy designer jewelry; you can make an original accessory with your own hands. Take note of a few ideas to create your own little masterpiece.
It's very easy to make a bracelet for your wrist. We choose a thick fabric, sew a wide ribbon from it, and put a backing inside, for example, felt. Along the outer area of the bracelet we glue beads, rhinestones, and pendants in a free order. We attach metal half rings to both ends of the tape, like on bag straps. We connect them with a clasp, check all the elements for strength and wear them with pleasure.


A flower made using the kanzashi technique can become an independent decoration or an addition to a hoop, hairpin, or brooch. Cut the fabric (preferably satin) into squares. The number of squares corresponds to the number of future petals. We turn each square into a triangle, then glue two free corners to the third. We sew these petals together and attach a rhinestone to the center.
Stud earrings from roses are also easily made. We purchase two pieces of satin ribbon and roll up the roses. Glue the flowers onto the carnation base, let them dry and enjoy the result. Due to the simplicity of the procedure, you can make several pairs of these earrings, differing in color.
Wire earrings look impressive. You will need pliers and special wire for making jewelry. We fold a loop from a small segment, bend the ends beautifully with a tool, and slightly press the opposite side inward. It turned out to be a heart. We make three such figures, different in size. We connect them with wire rings and attach the base of the earring at the top.
Translated from French, costume jewelry means jewelry made from inexpensive materials: metal alloys, glass, plastic, etc. In some cases, precious crystals or gold plating are used, but such options are more like imitation jewelry and their cost will be quite high.
Learning to make your own masterpieces is not as difficult as it seems at first glance. Talented needlewomen create from anything: from unnecessary trash they make incredibly beautiful and valuable things. Newcomers to handmade crafts can purchase everything they need at any craft and sewing store. The process of making jewelry is very exciting, it gives wide scope for creativity and self-expression. This is the perfect way to become a designer from scratch.

There are a large number of techniques for creating jewelry with your own hands:
- Modeling from;
- Lampwork – glass processing with a special lamp (melting beads);
- Wirework – wire weaving;
- Beading;
- Macrame.
This is not a complete list of methods. In fact, they can be made from anything, but you can’t do it without some experience and knowledge. The best option for anyone who wants to master this art is to work with ready-made elements. In this case, you don’t even have to buy special ones, such as round nose pliers, crimpers, etc.
Before starting the process, inexperienced beginners should pay attention to the types and quality of materials they will be working with. The better they are, the more professional the result will look. In addition, you should carefully approach the calculation of details and take into account their color. It also doesn’t hurt to think through the models of future accessories in advance. Later, as the hand hardens, creativity becomes intuitive.

What can it be made from?
Let's consider the main components that are used as materials for needlework.
- Beads. They vary in shape, size, and can be knitted, glass, woven, clay, felt, made of natural stones, or wood. Their range is so wide that you can use all your imagination when choosing.
- Leather and suede. They can be easily cut into pieces of different sizes and shapes; they go well with beads, wire, and stones. These materials are especially relevant for ethnic and country styles.
- Natural materials. This category includes stones, shells, wooden elements, and fur.
- Felt. This thick wool fabric is well suited for creating very bright accessories that can be an accent in any outfit.
- . It comes in aluminum, copper, brass, silver-plated and even gold-plated. It is advisable to purchase special wire, since technical wire (from construction wires) is of little use for decorative purposes. In addition, to work with it you need tools such as side cutters and pliers.
- Metal fittings. It is most often made in silver, bronze and copper. Such details will enrich and diversify the item, and can also play the role of its basis (sewing wires, bails, clasps, etc.). Particular attention should be paid to the clasps: the toggle maintains a fixed length of the chain, and the carabiner allows you to change it slightly. Magnetic clasps are good for light beads and necklaces; for heavy ones they come undone.

Tools you will need:
- Round nose pliers for creating loops;
- Pliers for holding, opening rings, separating chains;
- Side cutters for biting off wire;
- Tweezers for operations with very small parts;
- Crimpers for securing clamps.

Advantages of handmade
Handicrafts are not only interesting, but also very useful. Especially when it comes to homemade jewelry. Such things become a feature of individual style: created according to the author's idea and scheme, they are original and have no analogues. Also, hand-assembled accessories will help you not only stand out from the crowd, but also save a lot of money. In addition, you can always replace broken accessory parts with new ones.
The most beautiful creations are obtained by combining different techniques at the same time. This is justified by the fact that today there is a huge selection of everything that is required to work in various styles. In addition, they use, for example, beads from a grandmother’s chest or a beautiful stone that has never been used, rhinestones, or threads. All you need is fresh ideas and imagination.
It is worth noting another advantage of needlework. As you know, a hobby is the best source of income. Designer items are in great demand and cost a lot of money. This is explained by the fact that nowadays manual labor has given way to rapidly developing technologies.
Almost all material goods are produced in an in-line mode; outwardly they are almost the same and this partly deprives them of their individuality. Therefore, in the modern world, original work is highly valued and, due to its demand, development and assembly is an excellent idea for a profitable business.

Where to buy everything you need for creativity
Fittings and other components can be purchased in three ways:
- Buy in a specialized store;
- Order online, for example from us;
- Buy in bulk.
Some necessary components can be found from craftsmen who specialize in their manufacture. You can contact them on thematic websites or on social networks. Wholesale purchases provide an opportunity to save money, and in a regular store you can get advice from the seller, which beginners especially need.
Our store will allow you to combine several advantages at once: high-quality fittings, low prices and the opportunity to get a full consultation. Our specialists have excellent product knowledge and follow fashion trends, thanks to which they provide truly expert advice.
You may also be interested.
Every girl wants her image to be memorable, and stylish accessories come to our aid in this regard. Everyone knows that purchasing high-quality and fashionable jewelry costs a lot of money. But, beautiful handmade jewelry can highlight individuality in the best possible way. We will help you understand the fashion trends of this season and show you the most interesting master classes on making accessories step by step with your own hands at home. Master classes are designed for both beginners and experienced craftswomen. You will learn how to make spectacular earrings, original necklaces, elegant brooches, bracelets and much more using beadwork, and more.
 First, let's look at fashion trends. In the new season, as in the previous ones, chokers are not giving up their positions. They can be wide, narrow, metal, textile, with elegant pendants or multi-tiered. Place of modest pendants this season took over large necklaces and necklaces.
Large and very long earrings also came into fashion. Their length can reach up to the shoulders. Very relevant wear different earrings together or just one earring.
As for bracelets, designers suggest getting several bracelets that are similar in style and wearing them together. The same trend affected rings.
Brooches have regained popularity, only in the new season it doesn’t matter where you pin them. They will be appropriate in any place. As with bracelets, brooches are also recommended to be combined and worn in multiples.
Gallery: DIY jewelry (25 photos)


Master classes on making jewelry
Understanding fashion trends, let's move on directly to master classes that will help you make beautiful jewelry and bring to life the most interesting and original ideas. Let's start by creating spectacular earrings with imitation amethyst chips. To do this you will need the following materials:

Stages of making earrings, microns

At this stage our product is ready. As you can see, even novice craftswomen can make such a decoration. Another tip: To make the earrings look more impressive, instead of polymer clay chips, the core can be filled with glass chips of the desired colors. In this case, it will need to be glued with glass glue after baking the blanks.
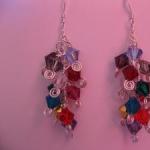
The next DIY glass decoration will be a great addition to your evening outfit. In addition, it corresponds to fashion trends. These are luxurious earrings made of rhinestones and beads, which have slight differences, but in general they form one whole. You do not have to exactly repeat the product from the master class. This technique allows you to make jewelry with various beads and stones. It's very easy to make them. To make jewelry you will need:

Manufacturing stages

That's all! Our earrings are ready. In the same simple way you can make bracelets, massive necklaces, hair ornaments and brooches. Jewelry made using this technique has the appearance of an expensive piece of jewelry.
As you can see, make your own jewelry The master classes will be easy even for beginners. And I’m not at all sorry for the time spent, because the result is amazing. Look at examples of different bracelets that will take you a minimum of time to create. These bracelets can be easily combined with each other to be on trend.
Very interesting DIY decorations are made from cords, chains, ribbons and threads. Braid the chains with ribbons, tie the cords into knots, add interesting pendants and beads to get an original product.
It's very easy to make jewelry using memory wire. This is a wire with turns a certain size on which beads are strung.
Making such a bracelet with your own hands is as simple and quick as possible. At first glance, it seems difficult, but even a beginner can handle it.
To make it, you will need a braid with a pattern the size of your wrist and beads that match the style. Sew on the beads, repeating the braid pattern, fasten the clasp at the ends and the elegant decoration is ready. You can make chokers in the same way.
The trends of the new season call for forgetting about modesty and wearing jewelry that would attract the attention of others. Check out with a simple master class rings with beads. To make it you will need:
- ring base;
- wire in the color of the base for the ring (approximately 25 cm);
- big bead.
Stages of making a ring
- Place the bead on the middle of the wire. Attach the bead to the ring base by wrapping the wire tightly around the base.
- Wrap the wire around the base of the bead in a spiral, forming a “frame.”
- Thread the ends of the wire in the opposite direction through the holes of the bead and secure them in an inconspicuous place.
 It is better to make several such rings and combine them with each other. You can attach several beads to one ring or use a solid stone instead, after drilling holes in it.