Parents instill a love of reading in their children in a variety of ways. Some force them to open the book, promising them candy in return, others say that if the child does not study, he will only be able to work as a janitor. The methods are different, and each has its pros and cons. But what all children love to do is close the thick Talmud they were reading. In order for your child to love opening a book, you can offer him to make a beautiful pencil bookmark from colored paper. Or any other option, for example a bookmark in the form of a cartoon character. How to do this, read below.
Pencil
This craft is assembled according to the origami principle. With skill, a pencil bookmark made of colored paper can be folded in just 10 minutes. To make it you will need colored paper. Moreover, you need to take a sheet that is tinted on only one side, and the other side should be white. A pencil bookmark template made from colored paper can be seen above. Actions must be performed one after another, in strict accordance with the scheme.
You should take the paper prepared in advance and fold it 1 cm. Now we turn the sheet over and bend its upper corners towards the center. We repeat the last step again. Turn the workpiece over and lift the bottom edge up. Let's turn the work around again. Now you should bend the right and left edges towards the center. We put the right corner into the pocket that was formed on the left side. The colored paper pencil bookmark is ready.
Cats

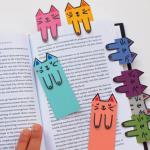
Even a child can create such a craft. While children might have difficulty making a pencil bookmark from colored paper, even a child can create a cat, and without the participation of adults. To make this craft you will need a rectangle cut out of colored paper. Cut a zigzag on the top edge of the workpiece. These will be the ears. Now in the middle of the rectangle you need to draw two ovals. You should outline them with a black marker. Use a thick felt-tip pen to draw a cheerful face for the cat. The ears can be painted with any other color. The bookmark is almost ready. Using a stationery knife or thin nail scissors, you need to make slits along the contour of the paws.
funny monster

This origami craft will bring a smile not only to the child, but also to his parents. How to make a funny monster? To do this you will need to take a square cut out of colored paper. In this case, the workpiece must be tinted on both sides. Let's get started. The first step is to fold the square diagonally. Now we bend the right and left corners downwards. The next step is to bend the corners to the center to create a kind of pocket. Now, from any other sheet that differs in color from the workpiece, you should cut a square. You need to insert it into the resulting pocket - this will be the tongue. You need to cut out a strip of triangles from white paper - these are teeth. All that remains is to glue the eyes to the blank, and the monster is ready.
Toothless

How to make a paper bookmark in the shape of your favorite cartoon character? Very simple. We will make the basis for the bookmark according to the same principle that we used to fold the pocket in the paragraph above. It is advisable to use black paper for this purpose. When the base is ready, you should cut out a decorative overlay, which will consist of the following parts: a large circle, two semicircles, two large ovals, 4 smaller ovals and 2 small horns. We assemble Toothless in the required sequence, focusing on the picture. If you want your bookmark to have the same gray border, then all the parts will need to be duplicated twice and glued to each other. All that remains is to make Toothless’s muzzle and claws. To do this, you need to cut out two circles from yellow and black paper, and 8 ovals from white paper. Glue the eyes and claws into place. The bookmark is ready, enjoy reading.
8 179 797
When reading a book, it is important to remember and record the page you stopped on; in this case, a bookmark will help. It is not at all necessary to go to a stationery store to purchase this simple accessory; we recommend making bookmarks for books with your own hands. Believe me, it's very simple! We invite you to make several original bookmarks using colored paper, felt, thread and paper clips. Consider the ideas below.
So, first, let's look at a few simple ways and make a bookmark for a book with your own hands, using available materials.
From paper
Bright and very beautiful paper crafts can be made with children. Bring unusual ideas to life.Option #1 - Worm
You will need:- Sample;
- Strips of colored paper;
- A sheet of colored cardboard;
- Glue stick;
- Scissors;
- Ribbon;
- Hole puncher.

Option No. 2 - Heart
If you are looking for unusual ways to create bookmarks for books from colored paper, then this option is just for you. You will need a minimum of time to work.You will need:
- Sample;
- Scissors;
- Glue stick;
- A sheet of colored paper.


Option No. 3 - Origami Hedgehog
Let's create origami from paper, we'll make wonderful bookmarks for books. So, let's begin.You will need:
- A sheet of brown and light brown origami paper;
- White paper;
- Marker black;
- Scissors;
- Glue.
- Fold the light brown piece of paper diagonally in both directions.
- Bend the sheet to form a triangle, fold the top of the sheet halfway.
- Now fold the right side of the triangle into the middle, and then the left.
- Next, we unbend the edges, the left part of the triangle must be folded parallel to the central vertical line of the figure.
- Repeat the same with the second side.
- After this, you need to bend both ends into the resulting pockets.
- Insert a sheet of dark brown paper into the corner of the bookmark, draw spikes on the brown sheet with a regular pencil, cut and glue.
- Make eyes, draw a nose. The creation of origami bookmarks for your books is now complete.
Option No. 4 - Origami Christmas tree
See a few more cool ideas that will come in handy when creating bookmarks for a book, check out the proposed master class. You will definitely delight your children with these origami bookmarks.
You will need:
- Green origami paper;
- Brown paper;
- Glue;
- Scissors;
- Glitter.

Option No. 5 - Bookmark with weaving “tie”

You will need:
- 4 strips of paper in two colors;
- Scissors;
- Double-sided tape.

Option No. 6 - Bookmark - mouse

You will need:
- Simple pencil;
- Colored paper;
- Lace;
- Scissors;
- Stationery glue.

From felt
Not only bookmarks made from paper, but also felt, are quite interesting. Let's try to make them together.Owl

You will need:
- Sample;
- Felt scraps in purple, pink and white;
- Threads;
- Needle;
- Glue gun.

Dress
You will need:
Technique:

- Transfer the outline of the pattern onto the fabric and a piece of felt.
- Cut out these parts, glue them together, then you will need to stitch everything along the contours.
- Glue the dress to the elastic and you're done. This handmade bookmark will become a real decoration for your book.
From threads
Make an original bookmark from threads using a simple manufacturing pattern. It's very simple.Pompon
You will need:- Knitting;
- Scissors.
- Wind the threads around your fingers as shown in the photo.
- Tie the resulting skein in the middle, leaving a hanging edge.
- Then cut the tied skein on the sides to create a pompom.
- Shape the pompom into a ball using scissors. You can make such bookmarks from threads of various colors according to your own taste.
From paper clips
Even ordinary paper clips can become the basis for a unique bookmark. Just decorate this stationery with a bow, buttons or thread and you’ll get a fun bookmark. Another idea is to straighten the paperclip and bend it into a heart, star, or clef shape. Isn't it original?
Try making an exclusive bookmark yourself, it's very simple. Fantasize and admire the results of your own work!


Use various cool scrapbooking ideas, experiment and create.


Some more interesting ideas and master classes

Modern people use paper versions of books or diaries much less often than electronic ones, but such a convenient accessory as a bookmark does not lose its relevance. For pupils and students, housewives and connoisseurs of books in classic paper form, a thing is needed that allows you to save or mark the place where reading was interrupted or important, interesting, valuable information was found. That is why you need to know the answer to the question of how to make a bookmark so that it is beautiful, convenient, stylish and durable.
Modern people use paper versions of books or diaries much less often than electronic ones, but such a convenient accessory as a bookmark does not lose its relevance
How to make a step-by-step easy bookmark for a PK book with your own hands from paper for boys and girls
Making unusual bookmarks that will later be used for books or diaries is not difficult. Various cool options are already available on the Internet, so you can choose any suitable one, but it’s best to use your imagination.
One of the options that can become the basis for creativity will require:
- paper (white - office or landscape, without lines);
- cardboard (preferably also white, clean);
- old postcard;
- scissors;
- office glue;
- a simple pencil (black or gray).
The finished bookmark will have the shape of a heart.
The stages of work are as follows:
- White paper should be folded diagonally (in half);
- In the lower corner, using a simple pencil, you need to draw the upper half of the heart;
- Then the resulting blank will need to be carefully cut out - this is a template for the bookmark;
- It needs to be put on a postcard and outlined;
- Cut out a smaller heart from cardboard (about half);
- The resulting parts need to be glued together.
The bookmark is completely ready for use. This option is suitable for children to make on their own.
Gallery: DIY bookmarks (25 photos)


DIY corner bookmarks in 5 minutes (video)
How to make a bookmark using origami in the shape of a heart for a competition
The origami technique is great for making bookmarks. An original heart-shaped craft will only require decorative or wrapping paper (a wide rectangle) of any color you like or, as a substitute, colored paper.
Execution technique step by step:
- Bend the paper horizontally;
- Fold the resulting sheet vertically;
- Lay the sheet horizontally and bend the edges (right and left) so that they look up;
- Roll the blank into the shape of an envelope;
- Bend the four corners of the craft inward.

Origami technique is great for making bookmarks
This beautiful bookmark is ready for use.
Paper corner bookmark: master class on making books
The corner bookmark is one of the most convenient and original.
It’s not difficult to create a beautiful craft, you will need:
- White paper;
- colored paper (two different colors);
- glue stick);
- a simple pencil;
- scissors.

The corner bookmark is one of the most convenient and original
Stages of work:
- On the corner of a white sheet you will need to draw 3 identical squares - 2 below and 1 above the other;
- In the lower and upper right corners you need to draw a line to divide them in half (diagonally);
- Shade the resulting halves (1 in each of the 2 separated squares);
- Cut out the blank, cutting off the shaded corners and the empty space between the squares - you should get a muzzle with ears;
- Place the resulting stencil on colored paper, trace it, cut it out - you get the base;
- Cut out a piece of colored paper of a different color that fits the shape of the muzzle, and stick it on the workpiece;
- The workpiece should be folded in half and straightened.
The bookmark is ready - now you can start decorating. Here you can use various paper elements and glitter. Based on such a bookmark, cool monsters are obtained, since the triangle is a muzzle, and the corner base attached to the book can be decorated with teeth cut out of paper. The corners can also be decorated with various small stickers.
The resulting craft can be used for books, thick notebooks, and textbooks.
Beautiful pencil bookmark made of colored paper
Textbooks, notebooks, diaries - all this needs bookmarks. Simple options look boring and casual, so you need to create a bookmark that looks fun. A craft in the form of a pencil is ideal. In order to make it, you only need a sheet of colored paper.
Stages of work:
- Fold a sheet of colored paper horizontally in half (colored side up);
- Unbend the sheet and bend the smaller side slightly inward (1 cm), then straighten it;
- turn the paper over with the colored side up and fold the corners from the shorter side towards the middle;
- Then, at these corners, bend the existing corners on each side;
- Then bend the largest corners on each side;
- Turn the workpiece over with the white side up and bend the uppermost corner slightly inward (it looks like a pencil lead);
- Then you need to fold the paper across (colored side up);
- The corners of the resulting rectangle will need to be folded towards the middle.

Ideal crafts in the form of a pencil
Cat bookmark: how to create it yourself
Cats always look cute and cute. As a bookmark, they will be the most suitable options for girls.
To work you will need:
- scissors;
- glue;
- colored paper;
- a simple pencil;
- White paper.

Cats always look cute and cute
Stages of work:
- Cut 3 identical squares from white paper;
- Then also cut out 3 identical squares from colored paper but of a larger size;
- Glue the colored squares together to get a diamond-shaped muzzle and ears;
- Cut off a part from the upper squares (first draw a line diagonally);
- Bend the right corner towards the middle;
- Apply glue to the left one and glue it to the curved corner - you get a rhombus;
- The workpiece should be folded in half and straightened;
- Glue 2 small white triangles onto the ears (1 each);
- Glue another white square onto the bottom of the workpiece in the form of a diamond.
Now all that remains is to draw the eyes and nose for the cat. You can cut out eyes from paper, and also make antennae from paper (thin strips).
Manual labor lesson on making a bookmark “Pencil”
Target: Make a “Pencil” bookmark using the origami technique.
Tasks:
Educational:
Develop the ability to follow the teacher’s oral instructions;
Learn how to work with paper;
Expand your horizons;
Correctional and developmental:
Develop attention, memory,
Develop fine motor skills of the hands and eye;
Develop in children the ability to work with their hands, accustom them to precise finger movements;
Develop creativity and aesthetic taste.
Educational:
- cultivate a caring attitude towards books.
Develop independence when completing tasks.
Continue to develop personal qualities in students: patience, accuracy, hard work.
Materials and equipment : multimedia projector, presentation on the variety of bookmarks, bookmark sample, paper blanks, glue stick.
Stages of the lesson.
1.Organizational stage.
2. Report the topic of the lesson.
3. Introductory conversation, viewing of the presentation.
4. Task orientation.
5. Practical work.
6. Report on the work done.
7. Assessment of the quality of work performed.
8. Summing up the lesson. Reflection.
Progress of the lesson:
1. Organizational moment:
Good afternoon, we are glad to see you at our lesson!
2. Report the topic of the lesson.
Today in class we will learn a lot of new things, and we will make something that is very necessary at school.
3. Introductory conversation by the teacher. View the presentation.
Teacher:
What do you like to do in your free time?
Expected children's answers: Walk, watch TV, chat with friends, play computer games, draw, read.
Now we are in the time of information technology, which means people prefer to spend their free time communicating on social networks, using a computer, phone, tablet.Unfortunately, adults and children have begun to read much less.But despite this. The book still occupies an important place in our lives. Especially at school. To study you need textbooks. Nowadays many people use e-books. But many adults prefer regular books. It’s so nice to sit in the evenings with a cup of tea and read an interesting book.
The book has not left our lives, it remains and requires careful handling.How to handle a book or textbook with care?
Expected children's answers: Take with clean hands, do not throw, store on a shelf, the textbook must have a cover, use a bookmark.
Teacher : It’s right that in order for the book to serve us for a long time, people came up with a bookmark
Tab for books – a device that allows you to quickly find the desired page in multi-page .
Let's conduct an experiment: Two students will look for the right page in different books. One has a bookmark on the desired page, and the other does not. Who will find it faster?
Conclusion: If there is a bookmark in a book, then you can find the right page very quickly, without spoiling the pages.
As you may have guessed, we will bookmark,
Teacher: Of course, you can take a regular sheet of paper and put it on the page where you finished reading. But it’s so nice to look at a book again and see a neat bookmark with pictures, made with your own hands.
But first, we'll look at what kind of bookmarks there are.
View the presentation “Such different bookmarks”
Dynamic pause "Butterflies"
Children are invited to collect butterflies that have “scattered” around the class.
(collect on a magnetic board)
4. Orientation in the task.
And now we will start doing the work, we will make a bookmark using the origami technique, a “Pencil” bookmark
Listen carefully to the explanation and do the work.
6. Independent practical work.
Step-by-step explanation from the teacher.
(each step of the work is performed along with an explanation)
1. Take a rectangle of any color (Fig. 1a)
2. Bend the rectangle in half lengthwise and unfold (Fig. 1b)
3. Bend down the top strip (Fig. 1c, d).
4. Turn the workpiece over to the reverse side and bend the upper side corners to the middle line (Fig. 1e)
5. Bend again along the intended fold lines (Fig. 1e, g)
6. Turn the workpiece over to the reverse side and bend the rectangle as shown in the diagram (Fig. 1h, i). The height and width of the pencil will depend on how high you bend the rectangle.
7. Once again turn the workpiece over to the reverse side and bend the sides, focusing on the fold lines passing through points A and B (Fig. 1k)
8. Insert one side part into the pocket of the other (Fig. 1k). The top edge can be glued.
9. The bookmark is ready (Fig. 1m)
7. Report on the work done.
Questions for children:
What did we do in class today? (children's answers )
What is a bookmark for?
What material was the bookmark made from?
What geometric shape was the blank for the bookmark?
Did you enjoy doing the work?
8. Summing up. Reflection.
Teacher:
Let's see your bookmarks. How did they turn out?
( discussion with children )
Everyone got neat and beautiful bookmarks. Well done!
Thank you all very much for the work done.