Hi all! I would like to remind everyone that soon we will celebrate the next holiday called Valentine's Day, which is celebrated every year at the same time on February 14th. What do you think is given in most cases on this day? Of course, small and cool paper valentines that resemble postcards, but only they are made in the shape of hearts and decorated with love and care.
Nowadays, you can easily go to the store and buy such beauty, but still there is nothing more beautiful than making such original pictures and giving them to your loved ones.
Do you know where this holiday came to us from, write your stories below under this post? I think so, so I won’t dwell on this question, but will immediately start with the most important and basic, teach you and show you step by step different ideas for crafts for Valentine’s Day, so let’s get started.
Of course, you can knit such creations, or even sew them; I recently saw how a heart was made from beads and even felt. By the way, for those who are interested in felt toys, I suggest you take a look at this
It’s no secret to anyone that even a child can make paper products, because such material is in every home; the main thing in this matter is to approach it competently and do everything as the author recommends. Therefore, watch these step-by-step instructions and repeat, the result will be simply stunning and very beautiful.
I suggest making the first option for two halves at once, for example, a husband and wife, and hanging such a decoration above the bed.
We will need:
- paper
- paints
- ribbon
- scissors
Stages of work:
1. As you can see, everything is quite easy and quick, dip your fingers in the paint, that is, apply it to the surface of your palms, and then make a print that will resemble a heart symbol.
2. Cut with decorative scissors and thread ribbon through.

The next way to make a Valentine card from what you have, so to speak from scrap materials, is to take cardboard, preferably pink or red, plus colored paper. You will also need glue, a pencil and scissors.
We will need:
- red colored cardboard - 1 sheet
- sheet of pink colored paper - 1 pc.
- pencil
- scissors
Stages of work:
1. Everything is extremely simple: fold a sheet of cardboard in half and cut out a heart, then from pink colored paper you have to make thin strips, which you cut as if you were making grass or something similar, twist each strip on a pencil.

2. Glue flowers onto the layout and you can optionally decorate it with sparkles and something else to your taste. The result is a slightly voluminous and at the same time elegant craft, which you can happily give to your mother or sister and tell them how much you love them.

And a similar idea that also captivated me also uses interlacing strips of paper:

But that's not all, if you use your imagination, you can come up with your own patterns, because there is nothing difficult here, see what can happen. Well, if you think that you can’t handle it, then contact me and I will send you stencils that you can use to make these lovely creations.

I really liked these views, there are stencils in enlarged form. By the way, such crafts are called intertwined paper hearts.

The simplest thing is that you can do this and decorate this ordinary heart with any decorations, letters, rhinestones, etc.

Master class on paper valentines for children
Undoubtedly, in schools today there is still such a tradition as setting up mailboxes and throwing anonymous wishes in there, which everyone then receives. You will agree that this is so cool and tempting that it makes this holiday unique for everyone.
Therefore, most schoolchildren, and just preschool children, love to create magnificent cards, and then give them to all those whom they love and adore.
Therefore, if you have children, then you can easily give them such a gift.
For children in kindergarten and at home, by the way, you can use this type of work as a group to make such a drawing, crumple a heart shape from ordinary toilet paper containers, and then dip it in paint and fill the entire Whatman paper. Even a 2-3 year old child can cope with this task.

And if you still haven’t learned how to draw a heart, then you can use this stencil.

After all, children can simply decorate it with felt-tip pens or pencils and draw their own patterns, or use nothing else. Anti-stress drawing, or as it is called coloring.

You can find various ideas if you want a bunch of such anti-stress products, of course this work will be more addressed to high school and high school students. I have several coloring pages in my piggy bank, if you are interested, write to me.

Or make a bookmark for this topic, cut out the hearts from paper yourself, and the child should glue them on as an example, but something like this.

You can also make origami, because such an activity will certainly delight the kids. Make a boat with them, and instead of a sail, a symbol of lovers on a stick.


Original postcard Heart for February 14th with a diagram
While I was preparing for this article, I found several ways to beautifully and unexpectedly surprise your loved one. After all, on this day you really want something that will make your head spin. For example, if your betrothed gives you a ring, but not just like that, but in your purse. It will look dignified and at the same time romantic.
You will need to cut out two figures like this from paper using ordinary sharp scissors:

And then connect them together, but in advance you will need to fold them in half, where you see symmetry, make a small cut where the antennae of the butterfly are.

You'll get something like this:

Now all that remains is to glue a ribbon or make it out of paper and insert a treasured gift with wishes or a banknote.

I can offer a more complicated craft, for those who are familiar with the technique of cutting out stencils, it will be easy for them, this is a method of poking with a special knife, as people say vytynanka. You can get the stencil itself completely free of charge, if you write a comment below, I will definitely send it to you.

You can also whip up such a masterpiece using your palms. I think that the process of making such a product is already clear.


It looks gentle and of course with love. Your loved one will definitely be happy and smile and give you a kiss.

In America and other countries, they very often give their loved ones paintings related to this topic, you can use newspaper publications, you don’t need to be an artist to create such work, see for yourself.

Well, another type is vytynanki, they are also appropriate to use here. And I will write more about them below. To be honest, such a souvenir can be taken to a competition in a kindergarten or school.

Here is its template, cut it out using a cutter or a special sharp knife.

Making voluminous valentines at home
As for such large and seemingly voluminous figurines for this holiday, I suggest first taking the easiest route and making a heart outline out of cardboard, and then using woolen threads, you can take different colors, or you can take a single color. Tie, that is, wrap, as shown in this photo.

In the first version, we made flowers and glued them to the workpiece, you can also do it in this case.

You can also easily and quickly cut out this ready-made pattern, and then glue the sides and the box together.

And then decorate it with all kinds of decorations, such as scrapbooking kits. I found a similar option in this video, I’m sharing it with you:
While I was writing this note, one idea came to my mind, and it came to me for a reason, my eldest son was sitting and putting together a mosaic of puzzles, so that’s what I came up with. How do you like what you saw?

Video on how to make a craft for Valentine's Day
Make such a romantic card in the form of your hands, everything will be clear without words.
Or do something more interesting:
Volumetric valentine in origami style
There are a lot of crafts on the Internet on the theme of Valentine's Day, especially using such a famous technique as origami, you can create hundreds of different patterns.
You can make an origami heart yourself using this step-by-step diagram, follow it and you will succeed. After all, it looks truly beautiful and original.

The steps are simple as always, you just need to fold the paper correctly.

And then the result will not be long in coming, first practice folding these lovely valentines on plain white paper, and then move on to colored paper.

Or use something like this.

You can also bake a very tasty one, and then stick special toppers on sticks into it. To do this, you just have to cut out hearts from paper, and then fold them like an accordion and glue them onto a stick.

Catch these templates, you can copy them and then easily print them yourself on a printer.

3D hearts are very popular now, you can also make them if you watch this video from YouTube:
You can request a stencil for this video from me below in the comments, I will definitely send it to you.
And also very original and super cool origami hearts with flowers, which I really liked.

Do you know how these are made? Now I will show you instructions with which you can make this wonderful thing.
Repeat the entire sequence, just take your time and be careful.

Then everything will certainly work out.
Happened? Then proceed to the next steps))).

Glue the rhinestone and make a handle. Voila, beauty.

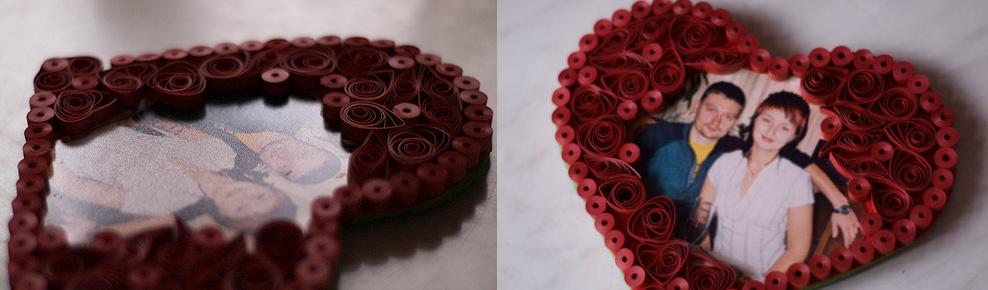
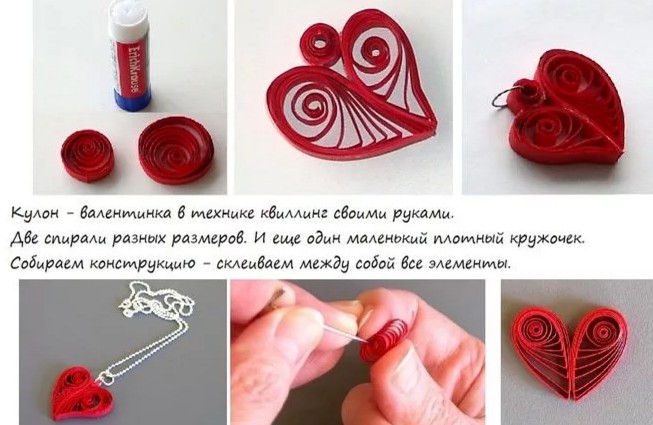
Heart made using quilling technique
Do you know what this unique and at first glance interesting word, quilling, means? In fact, a technique that helps you fold paper into little funny things in a very funny way. I think all those who love creativity and crafts are familiar with this type of work or have you ever seen such cute souvenirs.
If you know how to use and make such valentines, please share your work with us, I can only offer you these ideas that I liked myself.

I suggest you make a photo frame and something else, take a look and decide for yourself what is closer to your soul.
Or make this small but nice thing from strips:

We will need:

Stages of work:
Take a ready-made heart template or make it manually using a compass or something round. Then attach the stencil to thick cardboard and cut out the blank. Next, place the blank on colored paper and make some more reserve, as shown in the figure.

Glue on this green cover. Then cut out a heart from red colored paper and glue it to the back of the piece. On this side you can write a love note or poem.
Then make quilling figures, roll strips of paper onto a pencil, use a special ruler and a toothpick.

When you get the puck, leave it in the circle of that same engineering ruler.
Take your love photo and trace it to the shape you want, then stick it on with double-sided tape or tape.
Now all that remains is to glue all the elements. And that’s how wonderful and magical it looks.
And you can also make a red pendant, a symbol of love.
Postcard with corrugated paper roses
Well, now I offer another fairly common option of roses, which are easy to twist if you take the right type of paper, we are talking about corrugated paper.

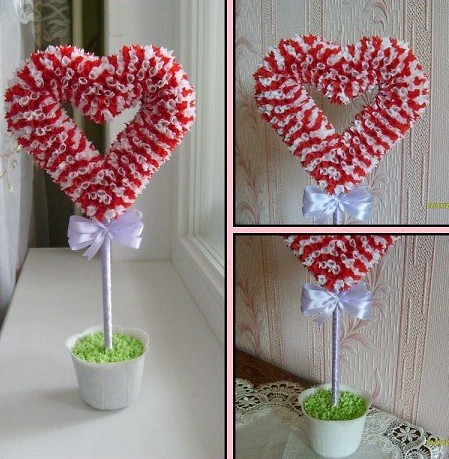
There is also a great idea for a very large valentine, which is made in the style of topiary, it looks great, at first glance you might think that such a charming invention is beyond your power, but in fact, believe me, your eyes are afraid, but your hands do.

Now you will see the necessary basics and based on this information you can easily build such a thing. Moreover, it can be given not only for Valentine’s Day, but also for March 8 or a birthday.
Stages of work:
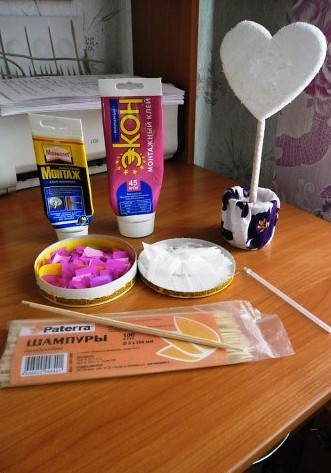
1. Take regular polystyrene foam and cut out a symbol of love from it; the thickness should be approximately 3 cm.
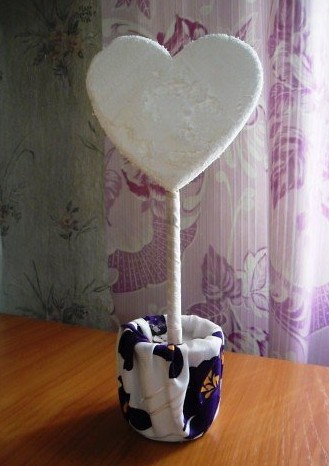
2. Next, take a stick or pencil; barbecue sticks are very suitable for this purpose and stick it into the heart. Hide the stick using a decorative ribbon. After that, insert the stick into the jar, it also needs to be decorated, wrap the dishes with cloth or paper, in general, with improvised means, you can even use plasticine.
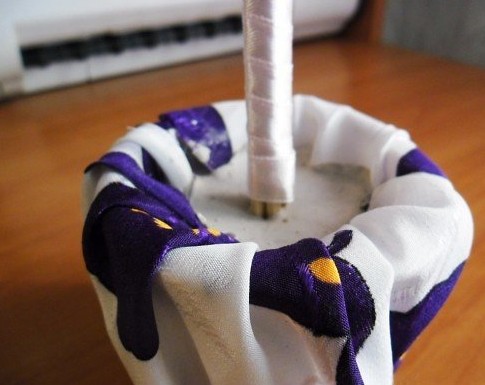
To prevent the stick from falling in the pot, fill everything with plaster.
3. Now prepare the following materials for work, this is glue, it is better to take something like liquid nails, they are more convenient to work with. Then you will need corrugated or crepe paper and a gel pen refill.
4. Now do the facing. The word is difficult at first glance, but nothing is difficult.
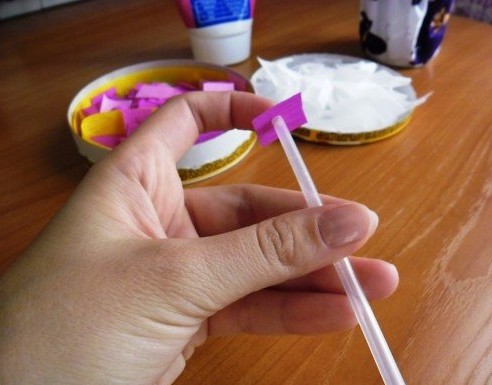
5. Stick the rod into the middle of the rectangle (cut the paper into small pieces of the same size) and then crumple it up.
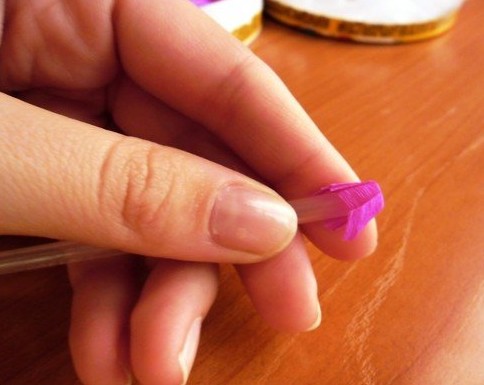
6. Now aim straight at the heart, glue the blank to the foam.
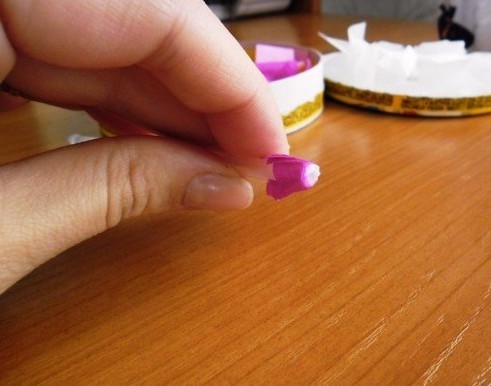
Remember that it is better to apply glue to the paper blank itself.

Using this cutting method, you can also make such a fluffy and voluminous card on cardboard.

Pictures and templates for printing
So we’ve reached the very last option, it will be unexpected, but also pleasant at the same time. In one magazine I saw such a cool new product for interior design and home decor.
I remember that when the New Year came, many of you asked me to send them templates for the window, so why not implement it here too, decorate the window for February 14th with the necessary symbols, these could be hearts, angels, doves, etc. How do you look at this, see how you can do it in an original way.


I really like this embodiment, and write your suggestions and reviews))).

And I honestly really liked these images of a girl and a boy. And you? There is also a diagram of Cupid and a fairy, as in the photo on the window. In my piggy bank there is a boy and a girl kissing in a heart and much more.

Therefore, if you also want to decorate your apartment with your children, then you can request all the diagrams and templates completely free of charge; as always, I will send them to everyone by email.
Well, for those who didn’t like such a creation, I give you small blanks that you can also print on a printer and give to your beloved family and friends.


This is how the selection turned out, I hope my finds will be useful to someone. Have a good day everyone, good mood and positivity! Bye!
Sincerely, Ekaterina Mantsurova
The approach of Valentine's Day awakens romantic notes in our souls, which we may be trying to muffle. After all, the pragmatism of the world around us sets us up for a practical approach to life. But despite all our commercialism, on the eve of Valentine's Day, we suddenly begin to enthusiastically look for a gift for a loved one, come up with touching words of congratulations, and even make crafts. DIY valentines. And who's to say it's not wonderful?

This custom came to us from the Middle Ages, when lovers began sending sweet cards to their loved ones for Valentine's Day. It all started with a note sent in 1415 from a London prison, or rather from the Tower, by Duke Charles of Orleans to his wife. It is she who is recognized in the world as the first valentine greeting card. And today, on Valentine’s Day, they still give each other valentines in the shape of hearts, on which sincere declarations of love, marriage proposals, and sometimes just jokes are written. The Italians, among other things, call this February day nothing more than Sweet Day, when lovers exchange gifts in the form of sweets and candies. But they also send valentines by mail in pink envelopes without indicating a return address. But among the Danes it is customary to send white dried flowers to each other. For the Spaniards, the crown of passion is a love letter sent with carrier pigeons. Interestingly, this day is also celebrated in Japan, where on Valentine’s Day it is customary to give chocolate to all male colleagues, referred to as “office chocolate” (or “giri-choco”). This custom appeared somewhere in the seventies of the past, when a box of chocolates given to a man was compared to a declaration of love. And in recent years, Japanese women have developed a ritual of buying such candies on Valentine's Day as a gift to themselves or a friend. The new custom was called “friendship chocolate” (or “tomo-choko”), and also “chocolate for yourself” (or “jibun-choko”).

We are already talking about how to make valentines from buttons.


Before Valentine's Day, it's time to master the art of quilling.
It is customary for our lovers to give hearts in the form of postcards. Today it is fashionable to do very beautiful DIY valentines. All you have to do is have a desire - and everything will work out for you. Neither the scarcity of material nor the lack of skills will stop you: all this is needed in the very minimum quantity. And if you, moreover, know how to do something skillfully, then so much the better: make a heart out of wood, if you have experience working with this material, sew it out of fabric, if you can just hold a needle in your hands, bake it out of dough , if you like to cook. The custom of giving valentines has never limited anyone in choosing the type of card, the main thing is sincerity and diligence, and then everything will work out for you!

Probably everyone will be happy to receive such a wonderful postcard envelope.

You can make a Valentine's card from cardboard, rhinestones, beads and paper.

Here's a detailed master class for you.

The best Valentine is an edible Valentine. Make a box for her, following the tutorial below.
For example, a funny miracle Valentine can be made from an ordinary matchbox. This method allows you to leave a secret message of love inside the box, which can give your loved one a lot of positive emotions and smiles. After all, it is on this day that you so want to receive such a testimony of love as a gift from your loved one. And I really want to give my other half something as a keepsake, something that would warm his heart and simply do something pleasant. To make our valentine you will need, of course, a box of matches, as well as a sheet of thick colored paper for decorating the box, a sheet of paper for the congratulations itself, a knife (stationery), scissors, pencils and markers, a ruler, glue and decorations for decorating the valentine . There are several ways how to make a valentine with your own hands in the shape of a matchbox. The first is to cover the finished matchbox with a sheet of bright colored paper, decorate it with colorful ribbons, homemade flowers, buttons, beads, hearts and other cute trinkets. The second is to first make a box according to a ready-made template: transfer the diagram onto hard colored cardboard (A4) and cut out the pattern for the future valentine card. Then, using a ruler, you should bend the parts along the bend lines and fold the box, smearing the valves inside the box with glue and inserting them into the slots that appeared after folding the sides of the box. Now all that remains is to decorate the Valentine's card. And in the end, it’s just a matter of small things: finding what to put inside the box. For example, you can make a booklet. The simplest option may be a two-page book. You can make an accordion from several pages on which any drawings or inscriptions for Valentine's Day are applied. Another option is an eight-page book. How to fill it? Believe me: your heart will tell you!

You can glue white circles on black cardboard and end up with a beautiful Valentine's card.

This is how a heart box is made for Valentine's Day.

The simplest and most touching Valentine's card.
To make a booklet, you need to print a template from thick paper. The color is chosen according to your taste or made to match the Valentine's card. Then you need to make a book from separate sheets of paper and use a ruler to align all the edges and folds of the valentine. It is also important to be able to decorate the message with taste: paint it with cute hearts, flowers, decorate it with an elegant frame, write a congratulation and give this wonderful valentine to the person you really love.

Still wrapping gifts at the store? Forget about it. Download, print and make a heartfelt gift on February 14th.
Can be made original do-it-yourself valentines, using many other simple methods. So you can use thick double-sided paper or thin cardboard. First, a blank is cut out to the size of a standard postcard, for example, 14 × 20 centimeters, and folded in the middle. On thick paper or cardboard, preliminary embossing is done at the places of future folds using an empty pen and ruler. To decorate a Valentine's card, a blank is cut out into the inside of the card. Its shape, naturally, is in the shape of a heart. But there is also an incision made inside it, repeating the shape of the base. After this, embossing is done along the fold lines. Folds are made so that the valves and small heart turn inward, and on the small heart you can glue the same one, but from paper of a different color. The valves are lubricated with glue. The blank is glued so that its middle coincides with the fold of the postcard. To do this, you just need to put it in the center and press those areas where the valves are located, coated with glue. And, of course, the fields of the valentine card must be designed according to your wishes. This option can be diversified: make several of these voluminous opening hearts inside the card, decorate them with lace, tinsel and other tricks. You can use electronic elements with a touching melody. It would also be appropriate to make ties in the form of small bows from bright braid. Cardboard or leather “straps” for closing the postcard also look interesting. In general, the scope for imagination is simply limitless!

And for such a valentine it is worth mastering the quilling technique.

Prepare strips of paper.

Use scissors to cut out the heart.

Use a utility knife to cut out the center.

Twist strips of paper around a toothpick and place them inside the heart.

Now secure the composition with glue. Blot the excess with a napkin.

Now let our valentine dry.

Decorate the composition with golden ribbon.
Using the Internet, you can choose another original way to make a valentine with your own hands, a master class of which with step-by-step instructions and illustrative photographs will help you in the process. Of course, even more convenient is a video with a full breakdown of the progress of work on the postcard. So, first, a blank for the Valentine is made and cut out of paper of the desired color. The dimensions of the inside of the postcard are 14 by 28 centimeters. The horizontal line of the pattern must be drawn so that it is exactly in the middle of the workpiece. The inscription “I love you” in English after cutting through part of the side contours (and in the hearts - the drop-down central part) will appear against the background of the entire opening valentine. Oh, by the way: the word “love” and the dot over the “i” in the text have been replaced with hearts. And the fallen parts can be used when decorating other valentines or gift wrapping. Upon completion of cutting, you need to fold the liner along the lines previously embossed with an empty pen. The result will be a kind of folding bed, like children's books: the postcard will open and the drawing will become three-dimensional. But only the inner half of the card is prepared this way. It will also need to be glued to the base cover, for which a sheet of colored paper or cardboard measuring 32 by 16 centimeters is taken. Moreover, cardboard can be taken in any color, but it is important to take into account that it will become visible through the cut out inscription. The inner part is glued to the cover with glue or double-sided tape. It is also important to ensure that the middle fold matches exactly, otherwise the card will subsequently become difficult to open. The margins remaining at the edges can be beautifully trimmed using curly scissors, making them look more original. As for the cover itself and the inside of the valentine, they can be decorated as soon as you want, which largely depends on the person for whom it is intended.

But these valentine envelopes are suitable for a dinner party or just to give them to loved ones.

Cut out several envelopes from red cardstock according to the template.

Glue it together and don’t forget to write a few kind words.
To make non-standard DIY valentine hearts, you can even use springs on which cute fluttering wings are attached. For such a valentine you will need: thick paper for the base of the card, flexible wire with a diameter of half a millimeter, adhesive tape (double-sided) with a foam base and colored cardboard. First, a pattern is drawn based on the future postcard. Wings are cut out of white A4 cardboard, and a heart is cut out of red cardboard. A wire is wound onto the handle shaft to create a spring, the middle of which is straightened for fastening in the postcard. Then the wings are attached to the ends of the wire using pieces of tape. The protective film should not be removed. Based on two pieces of cardboard measuring 3 by 1.5 centimeters, a valentine is formed: cardboard is attached to tape, tape is attached to it again, then a spring with wings is applied to it, tape is attached again, cardboard and tape are applied again. Then the film on the back half is removed and glued to the base of the postcard. The film on the front half is also removed and the heart is attached. This produces a heart, slightly raised above the level of the postcard and decorated with wings on trembling springs. Such a product may well become a decoration for the car interior if it is hung on an inconspicuous fishing line, and while driving, the heart will touchingly “fly” on snow-white wings.

Such an unusual valentine can even be a pendant.

It can be made from paper or plastic.


It turns out that even a child can make unusual valentines with their own hands. One of these cards is made from thick cardboard as the base of the card, a piece of newspaper or a page from a glossy magazine, lace ribbon, a piece of felt and colored paper. At the same time, a background made of colored paper is glued onto the cardboard base card, and a newspaper square decorated with lace and a heart is placed on it. Another creative way is a postcard with a heart made of buttons of different colors and shapes, decorated with a congratulatory inscription, reminiscent of embroidery with the remainder of the tip of the thread. But a wax heart can be made in a silicone mold (for baking cakes) from children's wax crayons, which crumble into a mold and melt at high temperature. After the heart has cooled, the Valentine card is considered ready.

If among your loved ones there are those who read books the old fashioned way, then you can make such a wonderful leather bookmark.

First, let's cut out the template. Fold a piece of paper in half.

Draw a heart in the corner and cut it out.

Now we have a ready-made template.

Now let’s transfer the template onto a piece of leather or leatherette.

All that remains is to glue the corner or sew it up with a machine.

It was a very nice gift.
A panel made of coffee beans looks very funny. It is very simple to do, but if you do it carefully, and add a good frame, you will get a very original valentine. First, a heart is cut out of cardboard, the size of which is not limited, but, perhaps, it should not be larger than a tea saucer. Black or brown plasticine is laid out on the cardboard in an even layer, 3.5 millimeters thick, onto which coffee beans are attached. Of course, you can also use a glue gun, which will make the work much easier. You need to start laying the grains from the edges: this way they will lie evenly and cover the edges of the cardboard. After this, the grains are laid out in a spiral towards the center. The workpiece must be placed in the refrigerator for 20 minutes, as a result of which the plasticine will harden. The finished heart is attached to cardboard with glue, and it is better to use a material with a textured rather than a smooth surface, and the finished panel is inserted into the frame. You can decorate a kitchen or another room with such a declaration of love, and its meaning will remain relevant throughout the year.

Who said that valentines can be made of paper? For example, this is how you can decorate white dishes for a romantic evening. Mix 3 tablespoons of powdered sugar, 1 teaspoon of water and 2 drops of liquid food coloring.


Subtle natures will appreciate the gift.
From hearts cut out of beautiful colored paper with a floral pattern and placed on top of each other, glued together DIY voluminous valentine. Many people like a heart-shaped book, the pages of which can be filled with poems or tender confessions. No less interesting are the heart-shaped baskets filled with small candies. It is better to take double-sided cardboard for them, and the inner side walls of the hearts should be secured with a ribbon, hang the baskets on the base and fill them with dragees or chocolate-covered nuts. If you tinker a little, you can make a wonderful closed heart box with candies. Moreover, it is better to use silver or golden paper when making it. You can coat plain cardboard with a glitter spray, and then decorate the box with a pale blue ribbon. For every lover, such painstaking efforts would be proof of great and sincere love.
Valentine's cards, paintings, boxes - all this is very appropriate on Valentine's Day. The main thing is to preserve those feelings that prompted you to make a touching souvenir in the shape of your own heart.
DIY Valentines video
Why for young people? 🙂
I can’t imagine an adult man in love who makes pleasant little things called valentines himself.
Are the young romantics still with me?
Then I’ll quickly tell you all the best things I’ve collected to celebrate Valentine’s Day.
By what criteria did I select ideas?
- ease of execution
- attractive appearance
Here are the romantic courtesies I liked the most:
- original paper valentines
- valentines made of fabric and felt
- heart cookies on ribbon
- mugs with declarations of love
- chocolates - valentines
- coffee panel
Now in more detail:
Coffee panel
Incredibly simple, but if carefully executed and in a well-chosen frame, it will turn out to be very original.
Cut out a heart from cardboard. The size depends on your wishes, but, I think, no larger than a tea saucer. Lay out black or brown plasticine in an even layer of 3-4 mm, to which the coffee beans are attached.
If you have a glue gun, use it, of course.
You need to start from the edges so that the coffee beans lie flat and cover the edge of the cardboard. Then lay out the grains in a spiral towards the center. Then be sure to put the workpiece in the refrigerator for a few minutes so that the plasticine hardens.
We attach the heart to cardboard (preferably textured, not smooth) using glue, and insert the panel into the frame. Such a declaration of love can decorate a room or kitchen all year long.


Mugs with declarations of love
Buy the simplest plain mugs and colored markers for glass and ceramics (all art stores have them). Draw hearts, write names and beautiful words. In any case, you will get a mug that no one else in the world has!
You don’t have to draw, if you don’t have any special abilities, just write words that ONLY YOU TWO UNDERSTAND... Well, and draw a couple of hearts.
By the way, to such a cup and tea bags need to prepare:


Chocolates - Valentines
Making a new cover for a small chocolate bar (tiny “Alenka” ones will do) is very simple - it’s just a regular strip of paper. How many hearts to draw and what note to make is up to you. Here are the options I found, but it could be better:

Heart cookies
This is where a little culinary skill comes in handy. For girls over 12 years old this is the best valentine option.
Here is a recipe for very simple and delicious shortbread cookies:
Grate cold butter (200 g), mix in a bowl with sugar (150 g). Add vanilla sugar (2 teaspoons), sour cream (300 g), a pinch of salt and mix well. All that remains is to add flour (600 g) and a packet of baking powder.
Place the dough in a bag and remove for 30 minutes in the refrigerator.
Roll out the layer, 5-7 mm thick, cut out hearts with a mold. The hole for the braid must be made BEFORE baking the cookies using a straw for juices.
Set the oven temperature to 180 degrees and leave for 20-25 minutes.
Maybe someone was offered their hand and heart?


Paper Valentines
The most banal valentines, which, however, can also become a pleasant sign of attention.
Postcard with a spring
From the pictures you can see that making such a card is very easy. Take two red squares (the size of regular pieces of paper for notes is 9 cm x 9 cm). Draw a heart in a spiral. It's no more difficult than drawing a regular spiral in a circle, just a different shape. Now we cut out our heart in a spiral, you will get a long ribbon. More precisely, two ribbons. They both end in neat little hearts that need to be glued together.
Now we cut out a white rectangle from cardboard 18 cm by 9 cm, bend it in half in the form of a postcard. Our spring needs to be glued to the inner halves of the card so that the entire surface of the first “circle” of the spiral fits tightly to the cardboard.
Your LOVE opens a Valentine's card, and there is a cute spring of two hearts. Nice and extremely simple...

You can also give sheets of paper that still have curly slots in the form of hearts, butterflies, and Cupids, and then clean the hole punch and use small figures for appliqués. .
Use something like this:

Simple cards made of colored paper with angel hearts did not impress me. I liked the valentines from designer multi-colored cardboard(more often it is sold in scrapbooking kits). This really looks romantic.


Here are two more simple options! Hearts made of beautiful patterned paper are placed on top of each other and glued together. The photo shows what the final version looks like. By the way, I also really liked the book-heart. I can imagine how many tender words can be written on the pages in small handwriting...


Most of all I appreciated heart-shaped baskets with sweets . It is better to use multi-colored and double-sided cardboard. The diagram is attached below.
The inner side walls of the hearts need to be secured with tape, hung and filled with small dragees and chocolate-covered nuts.
For me personally, such efforts would be a sign of great and pure love...))))


And a detailed master class on making closed heart boxes with sweets, !
There you can print out a diagram of this box and look at the photo to see exactly how it should be folded.
I also liked these valentine paintings. I don't think you should use any newspaper to make a tree. It’s better to print out poems by Shakespeare or Yesenin so that the fragmentary text is also interesting. Cutting out a couple of hearts couldn't be easier. Notice that the wood is glued between the frame pieces. You can even do it on top of the frame, it will only be more interesting.


I couldn’t pass up this “paper” idea either. The point is that you need to find covers of glossy magazines in green and pink tones (you can just use other colors that are not too colorful). Outline the palm and part of the arm from darker paper, cut hearts of different sizes from light paper. Very nice!
Here's another very simple option. Fold the hearts in half and glue only one side. Live butterflies-hearts!
And in the envelopes, I suppose - little notes with tender confessions... I hope you have enough patience!

Valentines made of fabric and felt
This is, of course, for lovers and at the same time diligent craftswomen. Nothing complicated, but this little thing will take a little longer than all of the above.
I think people get into this activity not only to simply show another person their sympathy, but to express their sublime feelings in the form of a pink heart with lace and beads... Why not? Sometimes you need it too!


Here's another cute romantic idea - a felt bracelet. I think it’s just right for 12-year-old lovers! :-). The panel already looks more serious and will completely decorate a room or kitchen, pleasing the eye until next February 14th.
Valentine's Day is a traditional time for love letters and notes. According to legend, priest Valentine reconciled quarreling lovers by helping legionnaires write letters. Since then, the name Valentina has been inextricably linked with love letters. But, despite the commercialization of the holiday, it is customary to make valentines with your own hands, because handmade work better conveys the sincerity of the giver’s feelings.
So, how to make a Valentine card with your own hands? There are many ways!
Everyone will be pleased with a delicious Valentine's card. Heart-shaped cookies or heart-shaped cake, waffles or cupcakes - choose to suit your taste! There are a great variety of baking forms - you can choose what suits you.

Traditional baked goods for Valentine's Day are gingerbread cookies in the shape of hearts.

Or you can make hearts from puff pastry without a mold. To do this, the dough is rolled on both sides into rolls, cut into thin pieces and slightly flattened to form dashingly twisted hearts, and baked in the oven.
Even with the help of crispy and fragrant toast, you can confess your love!

Even ordinary cookies can be packaged in a heart-shaped holiday box - and the gift will immediately become themed. You can buy a gift box, or you can make it yourself.
And if you break an egg in a frying pan into a heart-shaped mold, you will get “heart-shaped” scrambled eggs) Why not a Valentine? You can bake pancakes or cut sandwiches and waffles in the shape of hearts. You can even bake “hearty” pizza!


Handmade original valentines are a great opportunity to show your imagination and handicraft talents.
Don't limit yourself to just one handmade Valentine. Make a lot of different ones and put them in different secluded corners of the house, then your loved one will certainly be happy
Good afternoon, in this article I have collected the most interesting ways to make valentines with your own hands. You can give heart crafts to your loved ones and loved ones for Valentine's Day. After all, how nice it is to receive gifts made by YOUR OWN HANDS. For each craft, I will try to make a drawing (if there are no ready-made templates) and explain in detail what and how to do step by step. We will cut out valentines from paper, from cardboard, put them in the form of boxes, and make valentine envelopes and other crafts for Valentine's Day. Here are the most interesting ideas for making a paper heart using different volumetric techniques.
So let's begin our matters of the heart...
Paper Valentines
IN CARVED TECHNIQUE.
Here is the simplest craft. Which even children in kindergarten can do. The middle group or the senior group, when they are already quite good at cutting with scissors (without trembling hands and a sweaty forehead), can easily make this valentine with their own hands.

Everything is simple here. Flatten the sheet in half. Draw half a heart and horizontal lines on it. Cut the lines and cut out the heart itself. Unfold the heart and place it on the table fold edge down. And then the most interesting thing for children. You need to pull the strips UP with your fingers - but not all of them, but after one - leave one, pull out the second, skip one, pull the second up (changing the fold to the opposite one). We get a ribbed heart. Below we see a visual template for the blank for this paper craft of a volumetric heart. A simple and quick DIY Valentine card for children in kindergarten.

You will find many other ideas for simple children's Valentine crafts in a special review article
And here is another beautiful craft for children - in the form of a puff valentine. Where the layers of the heart are located in different planes.
Fold the sheet in half. Draw the outline of a heart on a piece of paper. And we highlight with bold lines the places where you can cut with scissors, and with dotted weak lines the places that do not need to be cut. We explain to the children which lines to cut.
And then with our fingers we bend the inner heart forward with the fold edge, and the outer heart with the central fold edge back, and the card itself becomes the fold edge forward. It turns out like in the photo below. A quick paper valentine - just a 20-minute lesson in kindergarten.

THIS IDEA does not have to be copied exactly. You can change it, play with it. For example, change the cut zone and fold zone on the same contours (as the drawing above).
That is, change the FLEX ZONE of such a heart contour (the zone that is indicated by a dotted line in the diagram) and get a new three-dimensional craft-postcard, where the heart is already protruding from the other side.

Take a closer look at the photo above. This Valentine's card has a large heart that is held together by an UNCUT BOTTOM OUTLINE. And the inner little heart is held on by uncut apex and tip on both sides of the center line. Here's what these changes look like on the diagram.

The most interesting thing is that you yourself can continue EXPERIMENTING IN THIS TECHNIQUE. Make slits in the shape of a heart or half-heart and bend them in different directions. And one day you will receive a cool designer craft.
For example, if you arrange the half-hearts IN A CIRCLE - then cut through the contours of the half-hearts and bend these contours - then we will get such an interesting round craft as a HEART ROUND DANCE.

This is what the intended drawing looks like - drawing a half-heart, in a circle.

Such an openwork layered applique can be pasted onto a card for Valentine's Day. You will get a beautiful DIY Valentine's card.
You will find even more ideas for greeting cards for Valentine's Day in our special article
DIY VALENTINES
WITH NOTES.
On Valentine's Day, we say warm words to our other halves. Declarations of love cannot be said in words (after all, at a solemn moment, all the most tender phrases can fly out of a lover’s head). Therefore, your mur-mur-phrases can be written on notes– roll up these notes and hide them in the buds of paper roses in this Valentine craft below.
See how beautiful it is - each twisted paper bud contains a small white a rolled up note. This craft with notes for Valentine's Day is easy and simple to make with your own hands. Now I’ll tell you exactly how to quickly and conveniently do this kind of work with your own hands...

Take a piece of thick cardboard (for example, a lid from a pizza box, it’s just big). We buy from stationery pack of red office paper(it’s just double-sided and dense – that’s what you need).
We cut the paper into wide stripes. We fold each strip in half LONGWAY(so that it is doubled - this will make the rose thicker and more magnificent). And then we twist this double strip into a roll (around the pencil). We remove the twist from the pencil, loosen it slightly, let it unwind a little and secure the tail of the twist with glue(so as not to stick out).
We make a whole lot of these paper rosettes so that they all tightly fill our cardboard heart. And then we attach them to a cardboard base - maybe with glue. A better with double sided tape– holds up remarkably well – cover the entire surface of the cardboard heart with strips of adhesive tape, remove the protective film and cover this sticky base poke our roses. Then we put a note in each bud with warm words, promises, confessions, heartfelt vows and intimate hints...
Second craft with a note.
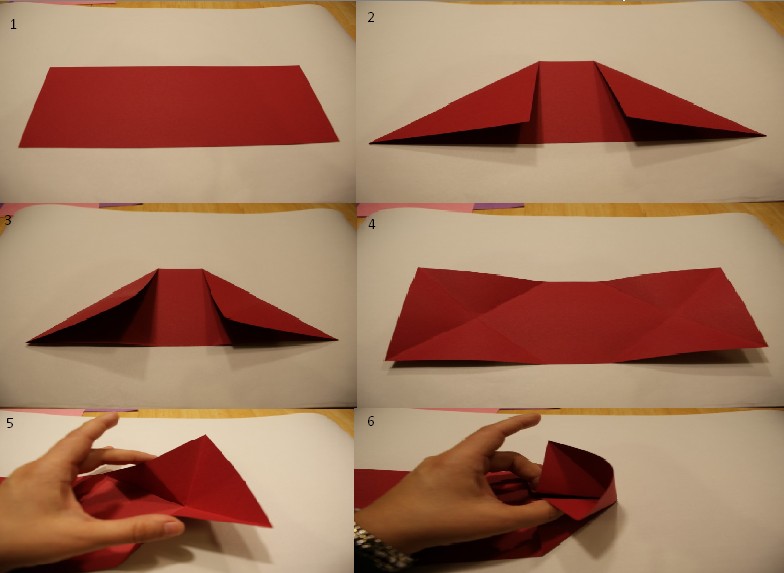
HEART WITH A SECRET.
You can also put a love confession inside a PAPER HEART with a gap in the middle.

Here is a detailed master class on making such a VALENTINE WITH A SECRET.
Take a square sheet of paper and fold it in half, lengthwise and crosswise. So that it spreads out along the folds - cross to cross (as in the first photo).
We bend the bottom edge of the square upward towards the middle horizontal fold line (photo 2).
Turn the sheet over, with this fold down (photo 3). Then we bend the right and left corners to the vertical midline (photo 4).

We turn the sheet over again with the other side up, corner down (as in photo 5). And bend the upper corners to the middle vertical line (photos 6 and 7).
And again we bend the same upper corners to the middle vertical line (photo 8).

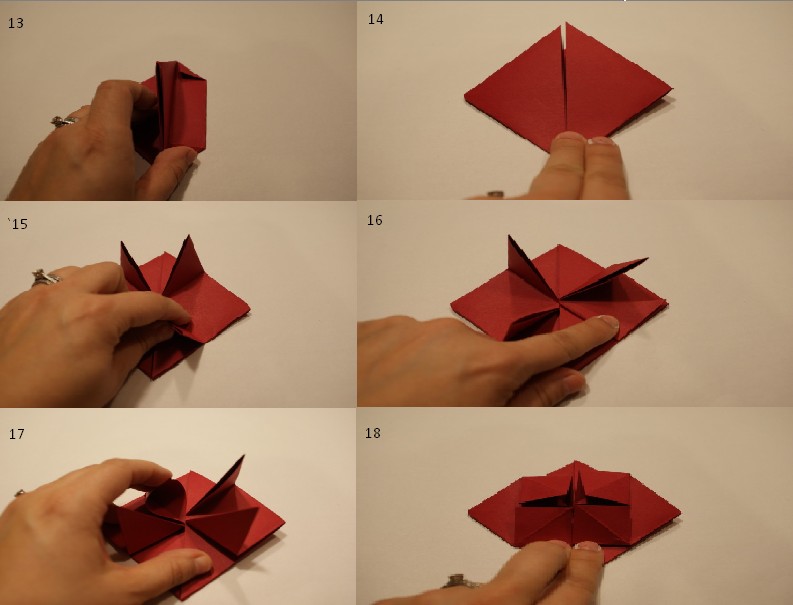
And now we bend our module (which has the shape of a hexagon) in half. That is, the upper corner of the hexagon lies on its lower corner. And then these ends appear at the top (photo 9).
These protruding ear ends need to be folded (as shown in photo 10) - that is, we place our finger on the corner of the ear (the one where the fold angle is) and press this edge of the fold to the edge line of the module. And as a result, our ear was flattened (as in photo 11).

Now look, our module has 2 layers - 2 triangular halves lying one on top of the other. We take the upper triangular half and put it into the POCKET on the lower triangular half (there is just such a wonderful pocket there (photo 12, 13).

There's just a little bit left. Change the shape of the ears sticking out at the top of the module - so that the ears look like rounded hills at the top of the heart.
First, we bend the rectangular ends of the ears - so that the ears become terangular in shape (photo 14)
And now that the ears have become triangular, you need to smooth out the sharp corners of these triangles. That is, bend them down (as in photo 15). And the whole valentine with your own hands is already ready - we turn it over to the front side.

You will find even more techniques for folding a paper heart on our website in a special article
And we continue...
VALENTINES-ENVELOPS
Do it yourself from paper.
And here you will find ways to make a heart-shaped envelope from thick paper or cardboard.
On a sheet of cardboard we draw a template for the future valentine, as in the photo below. You can copy the picture or draw it yourself based on the sample. The sizes can be any (to suit your task) - the main thing is to maintain the proportions. That is, the width of half the heart should coincide with half the width of the central rectangle of the envelope itself. All other sizes can be any size to suit your letter.
In such a Valentine envelope you can put a small gift - for example, earrings. Pin the earrings onto a cardboard in the shape of a heart (for example, beautiful velvet cardboard) - make two holes and insert the earrings into them. And put this velvet heart with earrings inside such an envelope. Healthy and beautiful.

You can make the envelope simpler. Here it is. Cut out a heart from cardboard or thick gift paper. Draw a rectangle inside the heart - so that the HEIGHT rectangle and HEIGHT zones above m were EQUAL.
That is it is not necessary to copy this template exactly from your computer– you can draw a heart of any size and shape yourself (thick or elongated – it doesn’t matter). The main thing is that the height of the rectangle is equal to the height of the zone that is located above this rectangle. And nothing else matters. You will get an envelope in any case.

You can also make a valentine letter with your own hands inside closed paper boats. Fold a sheet of pink (or beige) paper in half. And we place the palm stencil so that the fold line falls on the back edge of the palm. We trace the stencil - cut out two layers of paper along the contour at once, without unfolding. And when the silhouette is cut out, we unbend the folded stencil - and we get two open palms. And we glue a paper heart inside (folded). We write a love note or warm words to a loved one on a paper heart.

And when we want to give a gift for Valentine’s Day, then an envelope will not be enough. We need a whole box so that we can put a voluminous item (souvenir or gift) in it.
So let's see what simple Valentine boxes we can cut out and fold from a sheet of cardboard or flat paper
VALENTINE BOXES
How to make it yourself
Boxes in the shape of a heart.
Here is the first version of a simple heart-shaped box that you can easily make with your own hands from cardboard. You can see a stencil template for such a craft for Valentine’s Day in the diagram below.


And if this same template is slightly changed. Then you can make a valentine like this in the form of a box - with double entry of one box into another. The stencil will be exactly the same - with only one nuance - in it the lower corner of the heart should be STRAIGHT - that is, have 90 degrees. And the intermediate walls (between the hearts) should not have a point at the bottom - but instead they should have the same straight walls as at the top). Now I will try to draw such a diagram for this template so that it is easy and understandable for everyone.

To make everything clear, I drew a diagram below. You can see for yourself that the stencil differs little from the previous template - only the walls between the hearts are rectangular (not triangular) and the hearts themselves have an angle of 90 degrees (so that you can close them by pushing them into each other).


So head to this feature article to learn how to make these boxes with your own hands quickly and easily.
And since I started about heart boxes, I need to tell you a little about what you can put in them. Below are beautiful ideas for original CRAFTS FILLINGS for these Valentine boxes.
You can put crocheted heart toys in the box. For example, in the form of delicious plump donuts decorated with knitted icing and beaded sprinkles. Such toys can be used as pendants for the New Year tree - that is, they will faithfully serve your family for a long time on every New Year's celebration.


You can bake real Gingerbread HEARTS from the dough, cover them with red jelly icing and decorate with white icing made from egg white and powdered sugar

Any gingerbread dough recipe will work for these sweet Valentines. We bake gingerbread cookies in the shape of a heart. Let cool. In a saucepan we dilute red jelly azure. Soak 40 grams of gelatin in 100 grams of cold water, into which 1 packet of food coloring was added. After the gelatin swells, heat the mixture in a water bath, but not to a boil. Dip the whole gingerbread into this glaze using tweezers and place it on a dish in the refrigerator to harden.

And if you don't like to bake. You can buy ready-made square cookies in the store and decorate them with sweet fondant. Mastic dough is made in 1 minute - we buy Marmeloshow marshmallows in the store, heat them in the microwave - we get a sticky mass similar to plasticine. Sprinkle powdered sugar on the table - and in this powder (as if in flour) we knead our marshmallow dough. We get ready-made sweet fondant, from which you can make decor for cookies for Valentine's Day

Take part of the mastic dough and roll it out with a rolling pin - cut out squares from the rolled sheet to the size of the cookies. Glue the squares onto the cookies. We roll part of the dough into thin sausages - these will be the seams of the envelope. And we mix part of the dough with red food coloring - we make hearts from it and decorate our sweet envelope. If there is no food coloring, no problem.– hearts can be cut out from red marmalade.
You can make these sweet Valentines with your own hands using waffles, cookies, and cupcakes. We buy ready-made flour products and decorate them with sweet mastic made from Marmeloshow marshmallows melted in the microwave (our Soviet marshmallows are not suitable - only bourgeois rubber ones).
Valentines BRAIDS
With my own hands.
Here is a classic school craft - a paper heart. A woven valentine in the form of a checkerboard weave of strips threaded one through the other.

This is how such a heart is made. Fold a white sheet of paper in half and use scissors to cut out HALF OF THE OVAL. We cut three or four or five cuts at the oval - from the fold line and deep into the oval without going into the area of its round top with scissors. We do the same with the red sheet of paper. And then we insert two modules alternating its strips, as shown in the diagram below.

This simple classic craft has many creative interpretations. Depending on the curvature of the strip, we can get a different weaving pattern...

Let's see how this happens. If we modify the braiding module like this with rounded bumps, we will get a wicker heart with a pattern in the form of many small hearts.

If on the four lines of our module we make recesses in the form of 2 round ears on the left and 2 ears on the right. Then, when we fold a valentine with our own hands, we will get a flower with four petals in the center.

And if there is only ONE tubercle - and only in one direction - then we will get a HEART SILHOUETTE in the center (as in the photo below).

We can try to be creative creators ourselves and draw our own braided lines at random. Assemble a Valentine craft and see what unexpected pattern comes out in the end.
Moreover, we can decorate not only the wicker part of such a valentine with our own hands - we can also decorate the round EARS of the heart with curly carvings (as is done in the photo below).

DIY Valentines
TIERED ABUNDANCE.
Here is a Valentine craft that I really like. She looks very chic and rich. And it's very easy to do. Therefore, this valentine can be a theme for an activity in kindergarten or a craft for a class at school.


Below I show the module for valentines-ladders in three tiers.

Take a sheet of cardboard. And we fold it in three layers - that is, in a triple fold. Then we unfold this sheet. And cut it in half - diagonally. The angle of inclination can be any (this will not affect the essence of the craft). And then we supplement each such oblique strip with cuts. In each of the three folding parts of the strip, we cut EXACTLY IN THE CENTER, reaching with scissors somewhere to the middle of the thickness of the strip.
The cuts on the strips are different - please note - on one strip the cuts alternate between bottom, top, bottom. And in the second strip, on the contrary, the cuts alternate like this - top, bottom, top.

Then our walls fit these slits into each other. And we get the basis and backbone of the future DIY Valentine’s card. And on this wicker base we glue hearts, flowers, lace, rhinestones and other decor made of paper and cardboard.
And it is not necessary to make three folds on this module. An accordion can have as many walls as you like - 4, 5, 6. The more, the more tiers with heart-shaped decor this ladder craft will have.
Valentine pendant
Framed with your own hands.
You can make a very simple craft for Valentine's Day. Fold a sheet of white cardboard in half like a postcard. We cut a square window in one half so that the half becomes a frame for the future Valentine craft. And now we hang a double heart made of cardboard inside such a vertical postcard.

We cut out two hearts from cardboard and hang them on a thread, piercing one and the other heart with two stitches.

Crafts Valentines
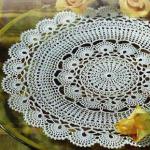
Made from cardboard with paper flowers.
These are the ideas for DIY Valentines we have collected for you in this article. Good luck with your creativity, you will end up with original crafts.
Olga Klishevska, especially for the site
If you liked this article
And you want to encourage our author, then you can send any amount convenient for you
to his personal wallet YaD wallet - 410012568032614