Weaving from rubber bands is very popular among both boys and girls. This is a very interesting activity that will not only help you pass the time, but also perfectly develop fine motor skills. Besides, how nice it is to know that you have beautiful and cute things made with your own hands. Sets of rubber bands are very inexpensive and can be bought in almost every children's store or even in a stall. They include many small rubber bands of different colors, as well as special machines and sticks for weaving. But, even if you don’t have special accessories, you can weave a toy or bracelet using not only a machine, but also pencils and a fork. Nowadays, animals made from rubber bands, which can be used as key rings or as a pendant for a phone, are very popular. Use your imagination and make a large toy zoo that will decorate your shelf, and this article will teach you how to weave the most popular animals.
Snake made of colored rubber bands on a machine
A special machine either comes with rubber bands or is purchased separately. The snake is perhaps the easiest animal to make.
- Not only will you need different colored rubber bands for the snake's body, but also black rubber bands for the eyes and a red rubber band for the tongue.
- As in any work, first you need to make the base of the product; to do this, pull paired rubber bands onto the rightmost teeth of the machine in 2 rows. Each rubber band has 2 teeth and so on until the edge of the machine. Alternate the elastic bands by color based on what patterns you want to make on the snake. Weave a chain using a rubber band hook - this will be the tail.
- The snake's head and eyes are made using three rows on the loom. 3 elastic bands are pulled on the right and left, and then they are intertwined in the center. Then the tail and head are connected and in just half an hour you have a wonderful snake ready!
We weave a hamster from rubber bands using forks
Even the most novice craftsman can easily make this cute rodent. You will need: 2 dinner forks, rubber bands in brown, white, black and pink (although if you want to make the hamster cosmic blue, then why not?), a small crochet hook (preferably plastic) and a little patience!
- Place the forks tightly together so that the teeth are located in different directions.
- Pull the white elastic band over the teeth in a figure eight.
- Place rubber bands between four pairs of teeth.


- Raise our resulting figure eight from the first point, holding the rubber band at both ends.
- The next rubber ring must be screwed 3 turns onto the 2 outer teeth of the fork. Place an elastic band on top and remove the elastic band from it. Throw it all over the left cutlery.
- Place the elastic in the middle of the two pairs of fork teeth.
- The resulting structure again needs to be pulled upward with your fingers.
- Do the same with pairs of bottom and middle elastic bands.


Thus, you must work according to one scheme, that is, throw on and weave elastic bands, then move the structure upward. In the process, you yourself will understand how to shape the body of this animal. When your figurine is ready, remove it and secure it with a clasp. Don't forget to reinforce the loops that come out with a crochet hook. When the figure is ready, straighten it to give volume.
Hamster made of rubber bands- this is a simple craft for which rainbow loom is used, which includes multi-colored rubber bands, a special plastic machine and a hook that helps to accurately perform all the actions. Such an animal can be hung from a mobile phone or made into a keychain.
Everyone is interested in the main question, how to weave a hamster from rubber bands on a machine, and is it possible to do without it? If you have already tried other 3D figures, you have noticed that it is on the machine that they turn out neat and beautiful, for example, or stars.
To make it look nice and neat hamster made from rubber bands, video You should watch the lesson before starting the creative process in order to better understand all the details. If you do not have experience in weaving, then first you need to try easier techniques, for example, a simple bracelet on a machine or on a fork, then complicate your task - make a voluminous wide bracelet, and only then can you start working on various 3D figures.
Hamster made from rainbow gum it can be one-color, striped if you use two-color rings, or it can be made in two colors, for example, the belly will be white and the back will be yellow. To make it neat, the main thing is not to get confused during the weaving process.
Weaving from hamster rubber bands
We will start with the first basic row, which will include eights. We put on the first eight between the first column of the central one (which is shifted to the left) and the far one (upper from us). Then we move along the top one, putting on three more eights. We put on the fifth one, again going down to the middle row, thus, as if rounding off our contour. From the central one we go down to the bottom one and put three more eights on the four lower columns. From the bottom row we rise to the top and close the circle. In total, for the first row of our craft we used ten rings twisted in a figure of eight.
The row closest to us forms the back, the far one forms the belly, so if you want the figure to have a white belly, then you need to throw three eights of a different color on the far row, and the rest will be in the color of your base.
Now you need to lower the first row with your fingers as far down as possible so that there is room on the posts for throwing on the next row. Now it’s time to make the hind legs; before putting them on the machine, you need to make them separately. In our case, they will be white, so we need to first put one ring on the hook and wrap it four times, and then do the same with the second - we now have a total of eight turns on the hook. The next white one must be hooked and thrown all eight turns onto it. Here we have our paw ready. Now we take the yellow elastic band and put it on the central and far left ones, without twisting them. We hook one “ear” of our foot to the upper left outermost post, while the second eye needs to be secured with a match or a clasp so that the rings on it do not fall off. We will finally secure the leg a little later.

Next, we need to put three more white rings on the top four columns, here we will have a tummy. And then, on the corner top post, fix another eye of the second foot, which must be made according to the already indicated pattern. And again fasten the second eye with a match. Next, we need to close the circle by putting on seven more yellow rubber bands (and we already had one on before we attached the first paw).
After the second row of our process, how to weave a hamster from rubber bands, on each column we had two rubber bands on the bottom and two on top. Now you need to carefully hook a couple of lower rings and remove them from the post to the center. On the top row, you need to fold it from the outside inward so that the paws do not remain at the edges, but are located between two columns.

How to weave a hamster from rubber bands
Let's move on to the third row. how to weave hamsters from rubber bands, for which you again need to put ten rings on posts in a circle, with seven yellow rings and three white ones for the tummy. After all the elements have been draped over, you need to again remove the two lower elastic bands from each column with a crochet hook, releasing them from the outside to the center. After this, the woven section must be lowered as far as possible to make room for further weaving.
The fourth row must again be put on ten rings in a circle - three white and seven yellow. You should always start with yellow, then three white ones, and close the row with yellow on the left side. After the rubber bands of the fourth row of our weaving are in place, you need to crochet the lower paired rings from each column of our machine. We shoot, as always, from the outside to the center.

We again correct our weaving with our fingers and lower the elastic bands down, because now we need to start the fifth row and finally finish the hind legs, one ear of which was secured to a match.
In the fifth row we throw on the first yellow elastic band on the left. Then we take the foot and remove the loop from the match, fasten it to the corner column. This is followed by three more white rings along the belly, and again we remove the loop from the match and throw it on the corner right post. We continue to throw on the rings, closing the row with yellow.
As you can see, there is no particular difficulty in this, the main thing is not to get confused in the rows, and for this, before doing this, you can give yourself a small hint on the sheet to remember in what sequence you need to attach the paws and in which row, etc. when all the elements of the fifth row take their place on the machine, and the rear legs are finally fixed on both sides, you can begin to remove the lower paired rings from the columns. They are removed in the center with a crochet hook, and then the weaving is lowered down with your fingers.

Hamster made from rubber bands on a machine continues to weave in a circle, and the sixth row also needs to be put on 10 rings - three white and three base colors, and then remove the bottom row using a hook.
Rainbow loom rubber band hamster can be made in any color scheme; after finishing weaving, you can attach a loop to it and make a stylish keychain or pendant for a mobile phone.

Weaving a hamster from rubber bands
Let's continue weaving a hamster from rubber bands, then the seventh row will follow, in which we will have not only the front legs, but also the ears. As always, first we put the first yellow one on the central and upper left ones. And then we make the front leg, this time we will use yellow again. We need two elastic bands, each of which must be placed on the hook four times. Next, reduce the speed on another single ring. Both “ears” of this rubber band must be put on the hook, and then take the next one, hook it with the hook and remove both of its ears from the hook.
Of course, it's difficult to explain in words, how a hamster is woven from rubber bands on a machine, video the lesson can deal with all the features of the new complex technology.
We return to the finished front paw, which we have in our hands. A loop on one side should be placed on the uppermost left column, and the second loop on the adjacent one in the top row. Of course, we will need another such foot, which will need to be thrown over two other adjacent columns located in the top row. There will be a white ring between them, because this is our abdomen.

Next, we put two rings on the side and move on to the ears, which are made using the same technique as the hind legs were made earlier, and to remember, how to make a hamster from rubber bands, video you can look.
We continue the process how to weave a hamster from rubber bands, video gives us the opportunity to review all points of interest several times. The made eyelet must be hooked with one end to the lower rightmost one, and the other to the adjacent column. Between them there is another ring of the main color and a second eyelet is also attached to two columns.

How to make hamsters from rubber bands
In the process of mastering technology, how to make hamsters from rubber bands, you can already imagine that in this way you can get other 3D figures, favorite animals or cartoon characters.
We continue to master the method, how to weave a hamster from rubber bands on a machine. Now it’s time for the eighth row, and before that the whole weaving needs to be lowered down a lot. On the eighth we will have eyes, but first we will add the first six rings: one orange, three white and two more orange. Then it’s time for the eyes, for which black rainbow loom will be used.

The eyes will be attached to the same columns as the ears. And you need to make them like this: wrap the black ring around the hook four times, and then throw the wraps onto the orange elastic band of the base. And hook both loops to the edges of the bottom row. Throw one ring between them, and then the second eye. By the way, it might work out hamster made from rubber bands on forks, but for this you will have to master the technique of such weaving very well, because it will be much easier to get confused. You can also master one more master class presented by.
Hamster made from rainbow gum
A more complex process - hamster made from rubber bands without a machine, and if you don’t want to waste your nerves, it’s better to immediately buy a convenient plastic machine, on which you can make other crafts using rubber bands.

We are entering the final stage how to weave a hamster from rubber bands, and we still have a spout, but before that, after the eighth row, we need to throw off the bottom pairs from each column and lower the woven part down.
The ninth row will be normal, completely including orange rings, since by this moment the hamster’s abdomen has already ended. Remove the bottom pairs again.
And if you don’t like this technique, then try it, besides, the material can always be found “under your feet.”
A hamster made from rubber bands is a fairly easy craft, for the creation of which you use a Rainbow loom weaving kit, consisting of multi-color rubber bands, a special plastic device - a machine, and a hook, which allows you to make the weaving more accurate. This animal will decorate your mobile phone or serve as a keychain. Many needlewomen are interested in how to weave a cute hamster from small rubber bands on a loom, and is it possible to do without it? If you have already woven 3D products from rubber bands, you have probably noticed that crafts made on a machine turn out to be more neat and attractive.
How to weave a hamster from rubber bands with your own hands quickly and easily
A hamster made of rainbow rubber bands can be either plain or striped, if you use two-color rings. You can also weave an animal with different colors of body parts, for example, make the tummy white, and the back yellow or brown. For it to come out neat, the main thing is not to get lost during weaving.

The following diagram will help you make your own rubber hamster. This cute figurine will be an adorable pet for beginners. Naturally, after they watch the video tutorials and master the hamster weaving technique well.
First of all, in order to get a neat and even figure, you need to remember the weaving order. First of all, step-by-step instructions with photographs that you will find below will help you.
On the machine.It is necessary to operate on the machine. If you have already woven animals from rubber bands, then it will be much easier for you. But even a beginner can understand that weaving requires a clear technique. That is, first you need to weave the base for the body, then the hind legs, then close the weaving, add the tail and forelimbs.
Let's start with the main line, and specifically, with the “eights”, which need to be fixed on 10 columns.
Put on the second layer without twisting. This is where the hind legs are strengthened. To make them, screw 2 elastic bands, 4 turns each, onto a hook, and then throw them into an empty elastic band.
Weave figure eights from bottom to top. Make 2 more lines and again weave the paired bottom elastic bands up. In the 5th line, close the paws of our animal.

Another layer of rubber bands, then make the front legs. Place the paws on the machine, fasten the rubber bands and make the ears.
Weave through the previous row and form another layer of elastic bands. Here you will also have the eyes of the animal attached. Weave them and attach another row.
Weave the next layer as well. Here, the rubber band hamster is almost ready.
Carefully remove our handsome guy from the machine using a spare device. Pull all the loops through the loose elastic band and tie a knot
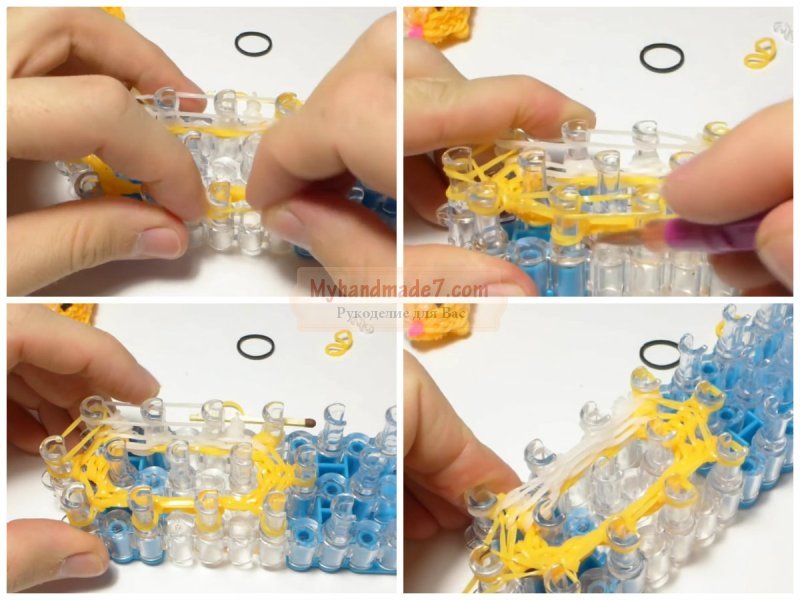
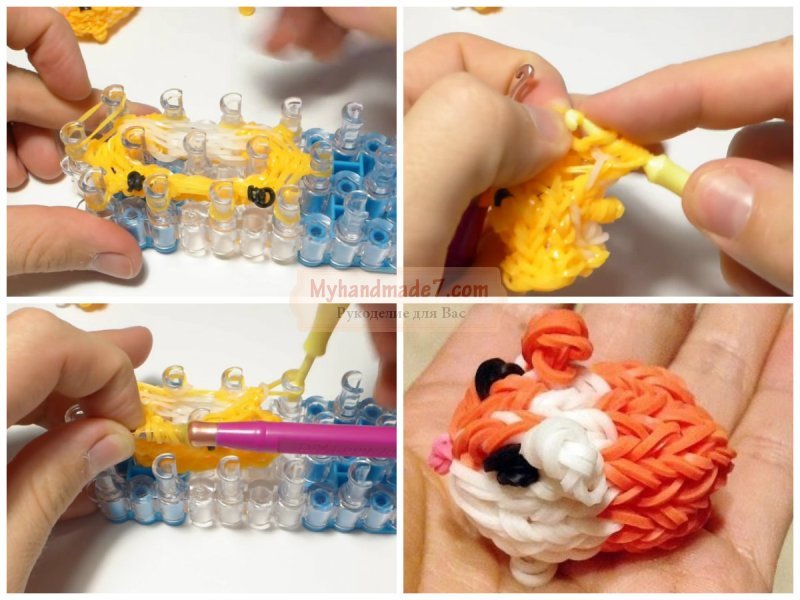
On the forks.There is no great need to purchase a machine for weaving a hamster. This product can be made on a fork. The only thing that will limit you is the volume of animals. In most cases, small samples can be made on the forks. For the provided method of assembling the toy, you will need to fasten 2 forks together so that the teeth look in two directions. As you can see, you can easily do without a machine.

Throw on the first elastic band, twisting it in a figure eight. In the future, paired rubber bands are also used, as shown in the photo. Throw the bottom one inside the weave. Attach in 4 turns using two adjacent cloves. Place on 2 opposite ones.
Halfway through, discard the pink elastic band. Drag the last one to the adjacent tip of the fork. Hook on the sides. Prick any back pair of cloves. Remove the center of the iris along the edges and the one on which the pink one is located.
Pull the bottom layer towards the center. Attach the dark ones in 4 turns. Put on a white elastic band and move the dark ones to the middle. Strengthen along the edges, and then two rubber bands for each of the pairs of reverse cloves. Peel the bottom layer from the edges towards the center. Continue weaving according to the described pattern until the upper part of the figure comes out.
Hook the weave onto the bottom of the face again onto the forks. Continue weaving, pricking on the reverse pairs of teeth, adding elastic bands sticking out from the sides of the top of the hamster.

Attach an elastic band to the side of the animal, add 2 on top for a pair of reverse teeth. Using your finger, remove the bottom layer. Continue stringing the ornament and throwing it in the same order.
Remove the figure from the forks and secure with an S-shaped plastic fastener. Straighten the animal so that it becomes more voluminous. Using a hook, close the hole from the bottom.
How to weave a hamster figurine on a slingshot, you can watch the videos that we have selected for you.
Video on the topic of the article
Teenagers and children have been captivated by a new hobby - weaving using colorful silicone rubber bands, Rainbow Loom and Loom Bands. This new type of hobby is exciting and has the ability to develop attentiveness, perseverance, fine motor skills, and imagination. Real masterpieces emerge from the hands of craftswomen: funny animal figures, original bracelets, pendants, handbags, keychains, etc. Every child can weave all this from ordinary irises. In the article you will find instructions on how to weave a hamster from rubber bands? This animal will be a great gift for a friend or yourself.
Step-by-step instructions and patterns for weaving a “Hamster” from rubber bands
How to weave a hamster figurine from rubber bands? Weaving an animal can be done on a loom or a fork. The master classes and videos below will provide detailed instructions for both methods for beginners. To work, you may need a hook: experienced craftswomen claim that it is better and more convenient to use a metal crochet hook rather than a plastic one. In addition, you need to choose the right colors to weave the hamster.
How to make a keychain in the shape of a “Hamster” on a machine
The machine greatly simplifies the process of creating various figures using irises. This instrument is an American product, where it was invented. The equipment is a plastic transparent platform on which pegs are located for ease of stringing. For this option, we need all three rows so that the central one rises slightly above the outer ones. Step-by-step instruction:
- It is necessary to string two pairs of elastic bands, as in the photo.
- We string six pairs on each side of the machine.

- We make a rounding.
- We form the middle: three yellow, three white, one yellow. We cling the iris to the last column of the central row in four turns.

- We make the legs: twist the white one four turns on the hook, add the yellow one. One paw is ready, let’s weave three more. We move them to their places.
- We form the ears like paws. Attach to the top of the head along the edges.

- We throw 5 triangles almost to the very bottom of the figure.
- We make the eyes in black and attach them to the second columns.

- We weave a small chain, hooking it on one side and the other.
- We start knitting from the end: right row, left, middle. We make a spout in the center. We make a loop at the top of the head and remove it from the machine.

How to weave without a machine, only on a fork

There is no need to buy a machine for weaving a hamster. You can make this product using available materials such as the tines of a fork. The only limitation of the work done without a machine is the size of the animals. In most cases, this allows you to create small samples. For this method of creating a toy, we will need to fasten two forks together so that the teeth point in different directions. Step by step instructions:
- We put on the first elastic band, twisting it in a figure eight. Next, for every two opposite teeth we hook a pair, as in the photo.
- We throw the bottom one inside. We cling four turns to two adjacent teeth. We put it on two opposite ones next.

- In the middle we throw off the pink one.
- We transfer the last one to the other end of the fork.

- We cling to the sides. We string one for each opposite pair of cloves.
- We shoot in the center of the iris along the edges and the one on which the pink one is located.

- Remove the bottom layer towards the center. We hook the black ones in four turns.
- We put on the white one, move the black ones to its middle. We grab along the edges, and then a pair for each pair of opposite cloves.

- Remove the bottom layer from the edges towards the center. We continue to weave according to the described pattern until the upper part of the figure is formed.
- We hook the bottom of the muzzle back onto the forks. We continue weaving, stringing it in opposite pairs, adding elastic bands sticking out from the sides of the upper part of the hamster.

- We hook the elastic band from the side of the animal and place it on top over two pairs of opposite teeth. Using your finger, remove the bottom layer. We continue to string the pattern and throw it in the same sequence.
- Remove from the forks and secure with an S-shaped plastic fastener. We straighten the animal so that it becomes voluminous. Use a hook to close the hole at the bottom.

Video tutorial for beginners on weaving “Hamster” with Sergey
In addition to a variety of bracelets and other crafts, novice weavers and craftswomen want to learn how to create all kinds of figures that can become a fun decoration for a bag, backpack, or keychain. The video tutorial below from Sergey from YouTube demonstrates step by step how to make a hamster toy. Thanks to the accessibility of the explanations, you can easily cope with this task and get a wonderful result in the form of an animal figurine. For work, you should prepare suitable colors: it is better to use as close as possible to the natural color of the coat.
You can read about how to make a hamster from rubber bands not only on the Internet, but also in magazines for teenage girls. Traditionally, rubber band weaving is considered a girl's craft, but recently this hobby is gaining popularity among adult women. So, many mothers, grandmothers and older sisters weave funny animal figures for their children. These could be kittens, puppies or hamsters.
The popularity of weaving from rubber bands
Many needlewomen are looking on the Internet for patterns on how to weave a hamster on a slingshot from rubber bands. Indeed, a hamster is an animal that, without exaggeration, everyone loves. Fat and thrifty the hamster symbolizes material well-being, so such a souvenir will serve as a wonderful gift for the New Year, birthday or any other holiday. Recently, making souvenirs depicting various animals from decorative rubber bands has become very popular because:

- This hobby does not require large material costs;
- Weaving develops fine motor skills, so it is ideal for creative activities with children;
- Thanks to the alternation of multi-colored rubber bands, you can make a variety of products: animal figures, models of vegetables, fruits and berries, hearts and snowflakes, letters, geometric shapes;
- There are many different ideas on the Internet and in magazines, complete with step-by-step instructions and high-quality photographs.
 Before you start working, you need to learn the basics of needlework by practicing weaving simple products, for example, bracelets. Only after this can you start making three-dimensional figures. The easiest way to make an owl or a hamster, because these animals have quite recognizable features.
An owl has big eyes and a sharp beak, while a hamster has puffy cheeks and a prominent belly. Weaving in a variety of colors is also good for beginners. You can make a rose, a tulip, and an aster, and on the Eighth of March a traditional mimosa branch is perfect. For New Year or Christmas, you can make interesting Christmas tree decorations from multi-colored rubber bands.
Materials for making a hamster
Weaving from rubber bands is very popular among girls high school age, due to its accessibility.
Sets of colored rubber bands are quite expensive, but needlewomen have adapted to using ordinary rubber bands for money, painting them with acrylic paints in bright colors. But in general, material the costs of this hobby are much less than the costs of knitting, sewing or embroidery. Dl I will need work:

Those who are taking up this type of needlework for the first time will also need a practical guide that will allow them to master the basic techniques of working with the machine. When purchasing a machine, it is recommended to choose a model that comes with a set of elastic bands and instructions for weaving simple products. The machine can be ordered online or, if desired, designed independently.
Its structure is very simple and resembles a primitive loom that was used by artisans in ancient times. You can also weave from elastic bands using an ordinary crochet hook, but the hook must be quite thin.
You need to buy rubber bands with a reserve, because they inevitably get lost during the work process. You only need to work at a wide table, then the material will not fall on the floor. It's best to make a craft box for your colorful rubber bands in advance. To do this, take an ordinary shoe box and make several cardboard partitions in it. The result is several compartments in which rubber bands of different colors will be stored.
For convenience, each compartment can be painted in its own color. The box should not be too deep, otherwise it will not be very convenient to get the material out.
After finishing the work, the remaining rubber bands must be put back in place and sorted by color, then they will not get confused, and you can proceed to making the next craft without any problems.
Needlewomen who have basic skills in weaving from rubber bands can weave a hamster without any hassle, spending only a few hours on it. For work, you can use not only a special machine, but also the most ordinary slingshot. Some craftswomen also weave by hand, but this method of work is traditionally considered more troublesome and time-consuming.
 In addition, if the needlewoman has thick fingers, it will be quite difficult to weave on her hands: the elastic bands will constantly slip and tear. It is best for beginning craftswomen to use a machine. Here is a general job description:
- You need to choose a simple pattern for weaving a funny animal with step-by-step instructions;
- Next, you should decide on the number of rubber bands of each color and arrange them in several piles (each color separately) on a well-lit table. There should be nothing unnecessary on the table. For left-handers, the light falls on the right, for right-handers - on the left;
- The first pair of elastic bands is put on the machine, and then weaving is carried out in accordance with the chosen pattern;
- When the hamster is ready, it is still difficult to recognize this funny, cheeky animal in this figurine. Therefore, in order to make the image clear, the figurine must be decorated: make a muzzle from scrap materials (beads and beads), make a tail and claws. You can put an artificial spikelet, borrowed from a decorative flower arrangement or also woven from rubber bands, into the animal’s paw. To weave a spikelet, you can use ordinary elastic bands for money in yellow and green colors.
You can make a whole family of little animals: mom, dad and babies. Or you can place the animal in a cage made of cardboard or woven from willow twigs. Such a souvenir will be an original gift for a child who dreams of a hamster, but for some reason his parents do not allow him to have this cute pet. The souvenir can also serve a practical function: serve as a key ring.
Before weaving a hamster from rubber bands on a machine, you should think in advance about what this figurine will be used for: for a children's game or for some practical purposes. If small children will play with the hamster, the decor should not contain small details, and the figurine itself should be made stable. The rubber bands need to be tightly woven together, otherwise the hamster may fall apart if the child plays with it too actively.
Of course, a children's toy should be larger than a keychain; a baby can easily put a small hamster in his mouth and swallow it.
Before weaving a hamster from rubber bands on a machine or on a slingshot, you need to decide on its color. A rubber band hamster can be any color. The main thing is to reflect in the weaving the most characteristic features of this animal: plump cheeks, small narrow eyes, small ears and tenacious paws with small claws, as well as a large belly. But in order for the figure to be truly recognizable, calm, neutral colors are suitable, for example:

Instead of eyes, you can insert small beads of any color. A hamster's eyes may be, for example, blue or green, and his nose and mouth may be pink. Instead of antennae, you can use pieces of regular fishing line. To make the animal look fluffy, some needlewomen glue a small piece of faux fur to the place where the tail should be. Another interesting decorative option is eyes with “moving” pupils, which can be purchased at children’s art stores or peeled off from an old children’s book.
The needlewoman should know not only how to weave a hamster from rubber bands, but also how to make this image bright. But if for some reason the hamster doesn’t work out, you shouldn’t get discouraged. You can make absolutely any craft from multi-colored rubber bands, but most often school-age girls weave animal figures, as well as dummies of vegetables, fruits, and berries.
The main thing is that the image is stylized, but recognizable. Color plays a big role: it should be natural. For example, if you weave a blue apple, it may be mistaken for a ball or a balloon. If the apple is red, with a green branch, this fruit is easily recognized by its characteristic features.
If you attach the appropriate accessories to these fun figures, they can be used as key rings for keys, wallets, bags, backpacks or mobile phones. But you can also weave original jewelry from multi-colored elastic bands. These can be rings, bracelets or beads, but usually beginning needlewomen weave “baubles” - simple bracelets decorated with geometric patterns.
 From several baubles you can make multi-tiered beads or a belt. And finally, make decorative panels from rubber bands. To do this, a thin canvas is woven according to the chosen pattern, decorated with ornaments or letters, and then this canvas is hung on the wall in much the same way as paintings are hung. You can also weave original bookmarks for books.
Weaving from multi-colored rubber bands using a special machine is an excellent hobby option for those who like to make original things with their own hands. Girls from 5-6 years old can do this type of needlework. Unlike bead weaving, working with elastic bands does not strain your eyesight, and this is the main advantage of this type of handmade craft. If the craftswoman already has basic crocheting or macrame skills, she will easily master the secrets of weaving on a machine. You can use any scheme, the main thing is patience and attentiveness.
Attention, TODAY only!